• Skip to primary navigation
  • Skip to main content
  • Skip to primary sidebar
Free Ebook!Subscribe to updates & get a recipe book!

Subscribe & Receive My Free Recipe Ebook!

The Chunky Chef

Comforting Family Recipes

  • All Recipes
  • Learn to Cook
  • Shop
    • My eBooks
    • Favorite Products
  • About
  • Contact
  • Trending:

    Slow Cooker

    Easy Dinners

    Desserts

    My Saved Recipe Box
  • Browse By:
  • Course
    • Appetizers
    • Breakfast
    • Main Dishes
    • Sides
    • Drinks
    • Desserts
    • Salads
    • Soups
    • Sandwiches
    • Healthy-ish
  • Ingredient
    • Chicken
    • Beef
    • Pork
    • Turkey
    • Seafood
    • Meatless
    • Pasta
  • Cuisine
    • Asian
    • Italian
    • Mexican
    • Hawaiian
    • Middle Eastern
    • Comfort Food
  • Method
    • One Pot
    • Crockpot
    • Instant Pot
    • Oven
    • Fried
    • Grilling/BBQ
  • Trending:

    Slow Cooker

    Easy Dinners

    Desserts

Home / Bread

Garlic Cheddar Beer Bread

4.86
/5
55 minutes
69 Comments
Jump to Recipe Print Pin
By: The Chunky Chefpublished: 05/06/2020

This post may contain affiliate links. Please read my disclosure policy.

pinterest image for beer bread
Smaller pinterest image for beer bread

Whip up a loaf of this Garlic Cheddar Beer Bread with NO yeast! No rising time, no special equipment, just mix and bake!  Tastes like Cheddar Bay biscuits, in loaf form!

This Garlic Cheddar Beer Bread is one of those recipes we love to bake for us, and for our friends/family.  We love other easy bread recipes like my No Knead Bread and Honey Beer Bread.  This is one of my Bread Recipes I know you’ll want to keep around!

Buttery top of garlic cheddar beer bread in baking pan

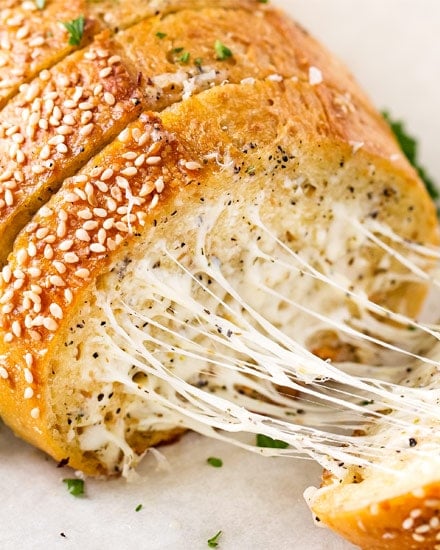
GARLIC CHEDDAR BEER BREAD RECIPE

During the past month or two I’ve been doing what so many of you have been doing… baking.  I decided to tackle bread making, and when I first started I was leery of using yeast.  Plus, yeast has been hard to find in the grocery stores as of late.

Helpful hint: If you’re in the Midwest, GFS (Gordon Food Service) has 1 lb. packages of yeast for a verrrry reasonable price, and they always had them in stock when the other grocery stores were out of the little packets.

So quick breads have been a go-to of mine.  From banana bread to an over the top glorious cinnamon roll bread (recipe coming soon!), and to beer breads of course.

My honey beer bread has quickly become a favorite for a lot of you, so I wanted to try out some other beer bread flavors.

One of my all time favorite bread products is Red Lobster’s Cheddar Bay biscuits.  I cannot get enough of them, and I’m just glad they don’t have a location super close to me, or I’d be eating my weight in carbs, and that’s probably not the best thing to do on a regular basis lol.

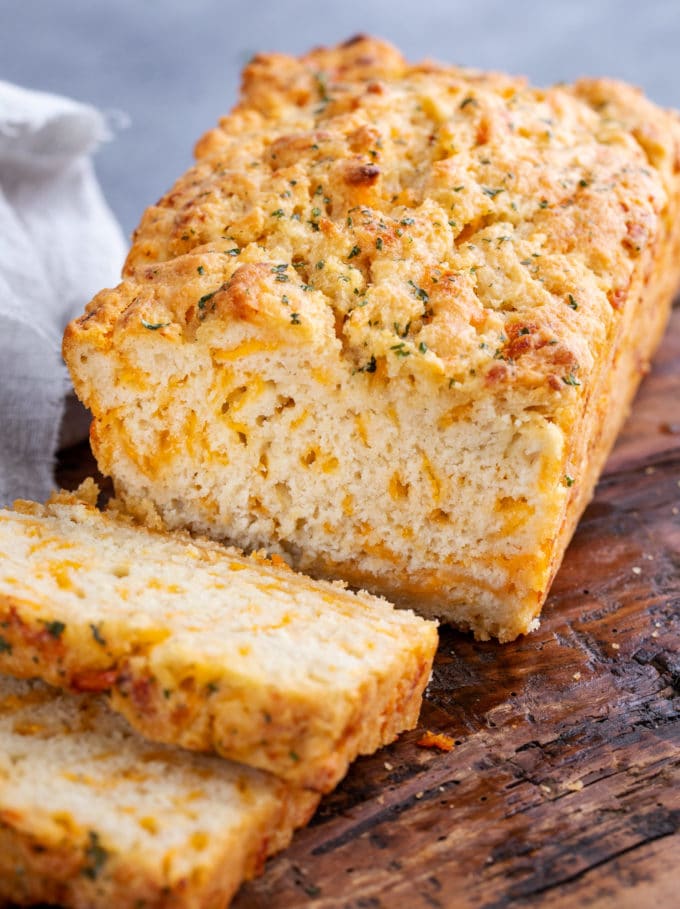
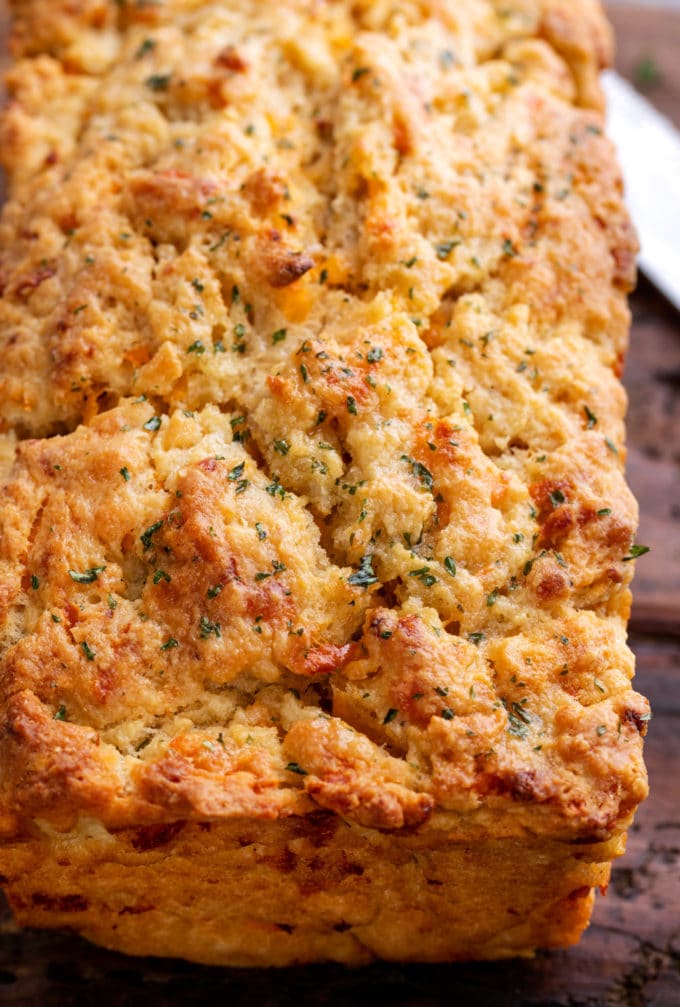
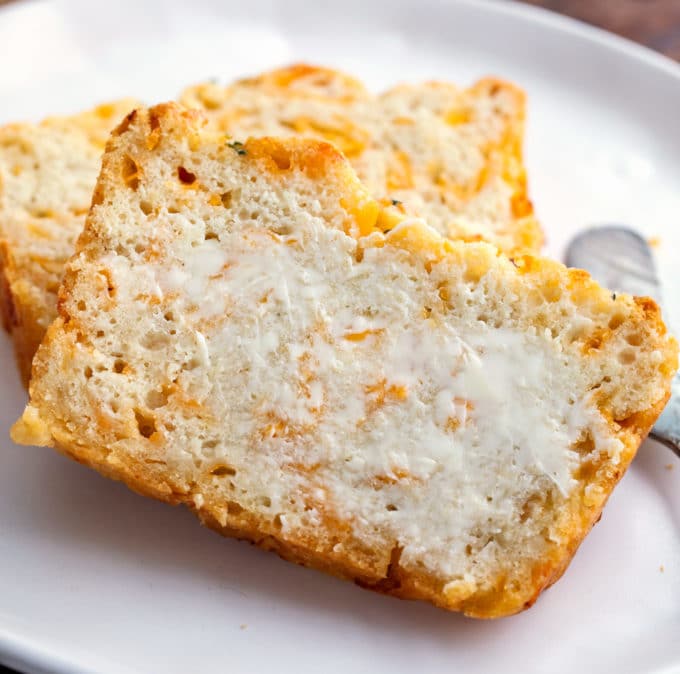
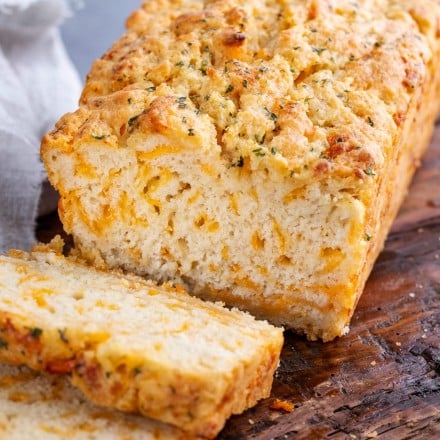
So I put those cheddar bay flavors into this loaf of beer bread!  It’s garlicky, it’s cheesy, it has that delicious slight bitterness, and the garlic butter topping is out of this world.

Sliced loaf of beer bread with cheese on wooden cutting board

HOW TO MAKE THIS BEER BREAD

  1. Preheat oven and prepare loaf pan.
  2. Add dry ingredients to mixing bowl and stir.  The dry ingredients here are flour (regular all-purpose), granulated sugar (for a touch of sweetness), baking powder (helps the bread rise), garlic powder (amazing flavor), and salt (for more flavor).
  3. Stir in cheese, then pour in wet ingredients.  Just give the shredded cheese a toss in the flour mixture, and make a little well in the center.  Then pour in your beer (choose your fave).
  4. Stir until combined.  Just use a rubber spatula or wooden spoon and stir until all the flour is incorporated.
  5. Add half the melted butter to the bottom of the pan.  This helps release the bread from the pan after baking, as well as adds extra buttery flavor!
  6. Add the batter and top with remaining butter.  This ensures a nice golden brown top, plus, more buttery flavor.
  7. Bake until golden and cooked through.  This always takes about 47-ish minutes for me, but since all ovens are different, make sure you test with a toothpick or knife to check for doneness.
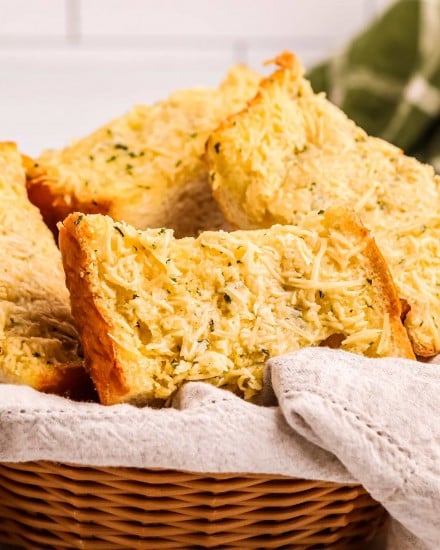
  8. Brush with garlic butter.  The garlic butter mixture is simply butter, dried parsley and garlic powder.  Give the top a gooooood bath of that butter mixture, it’s amazing!
  9. Let cool in the pan for a bit, then turn out to cool on rack.  After about 5-7 minutes, brush the bread again with any remaining butter mixture, then let it finish cooling on the rack.  It’s SO tempting to dive right into this bread as soon as it comes out – but I think it has the best texture when it’s been cooled for about 30 minutes.  Still warm, but not hot.

ADDITIONAL COOKING TIPS

  • USE YOUR FAVORITE BEER – I like to use a regular Budweiser or Miller to make this bread because it’s cheap, and produces a very light beer flavor.  If you prefer a more robust beer flavor profile, feel free to use an ale, or your favorite brew.
  • TEXTURE – don’t expect this beer bread to have the same texture and crumb as a sandwich bread or a loaf from your favorite bakery.  This bread is dense and hearty, with a tendency to crumble a bit as you slice it… while still being incredibly moist and tender.

Textured crust of beer bread loaf

VARIATIONS OF THIS RECIPE

  • NON-ALCOHOLIC – a huge percentage of the alcohol is cooked away when baking this bread, so it won’t give you ANY sort of buzz, but if you’d rather not consume alcohol, my best substitution would be non-alcoholic beer.  Maybe a seltzer water would work, but I haven’t tested it.
  • MUFFINS – if you’re in a hurry, you can make garlic cheddar beer bread muffins!  Just lightly grease a 12 cup muffin tin, add 1/2 tsp of melted butter in the bottom of each muffin cup, fill the cups 2/3 of the way up with batter, and spoon another 1/2 tsp of melted butter over the top of each one.  Bake at 375°F for about 15-18 minutes, until a toothpick inserted into the middle comes out clean or with just a few moist crumbs.
  • FLAVOR ADD-INS – you can totally customize this bread!  Feel free to add in some of your favorite seasonings, or different cheeses!  Bacon and/or chives are great additions as well.
  • SELF-RISING FLOUR – if you don’t have any all-purpose flour, self rising flour will work – just omit the baking powder.
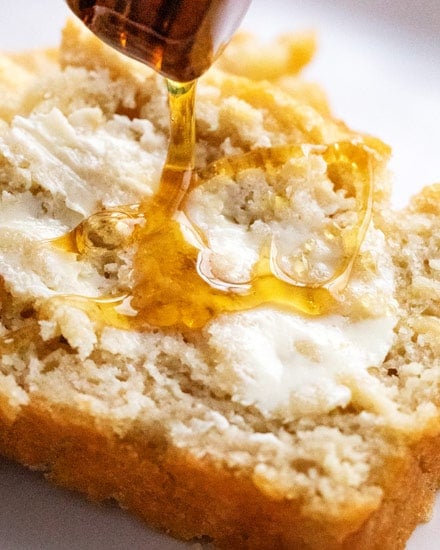
  • HONEY – You could substitute the sugar with honey if you prefer.

MAKING BEER BREAD AHEAD OF TIME

This bread is definitely best when made fresh, and other than the baking time, it comes together so quickly!

STORAGE

This bread can be kept at room temperature in an airtight container for up to 3 days without losing freshness.

Beer bread with butter on white plate with butter knife

FREEZING

Baked beer bread can be frozen for up to 5-6 months!  Cool it completely and wrap tightly in plastic wrap, then place it into a freezer container.

Thaw in the refrigerator and microwave a slice for 20-25 seconds for a “warm from the oven” flavor!

SPECIAL EQUIPMENT FOR THIS RECIPE

  • Mixing Bowl – no fancy tools here, just a lightweight and economical mixing bowl.
  • Rubber Spatula – I like to use spatulas like these that are all one piece, as they seem to hold up better.

BE SURE TO SCROLL DOWN TO CHECK OUT OTHER READERS’ COMMENTS FOR TIPS AND REVIEWS.

AND DON’T FORGET, IF YOU’VE MADE THIS RECIPE, LEAVE A COMMENT AND PLEASE GIVE IT A STAR RATING LETTING ME KNOW HOW YOU ENJOYED IT!

Did you make this? Be sure to leave a review below and tag me @the_chunky_chef on Facebook and Instagram!

Sliced loaf of beer bread with cheese on wooden cutting board

Garlic Cheddar Beer Bread

4.86 from 35 votes
Author: The Chunky Chef
Prep Time: 10 minutes
Cook Time: 45 minutes
Total Time: 55 minutes
Calories: 2687
Servings: 1 standard loaf
(hover over # to adjust)
Print Rate Pin
Whip up a loaf of this Garlic Cheddar Beer Bread in practically no time - and with NO yeast!

Ingredients

  • 3 cups all purpose flour
  • 2 1/2 Tbsp granulated sugar
  • 1 Tbsp baking powder
  • 1 tsp kosher salt
  • 1 - 2 tsp garlic powder depends on how garlicky you want it
  • 1 cup shredded cheddar cheese
  • 12 oz beer
  • 3 Tbsp melted butter

GARLIC BUTTER TOPPING

  • 2 1/2 Tbsp melted butter
  • 1 tsp dried parsley (or around 1 Tbsp minced fresh parsley if you have it)
  • 1/2 tsp garlic powder

Instructions

  • Preheat oven to 350°F and lightly spray the sides of a 9x5" loaf pan. Set aside.
  • To a mixing bowl, add flour, sugar, baking powder, salt, and garlic powder and stir to combine. Stir in the shredded cheese. Make a little well in the center of the dry ingredients.
  • Pour in the beer and stir until no flour streaks remain.
  • Add half of the melted butter to the bottom of prepared loaf pan and tilt the pan around so the butter coats the bottom of the pan. Transfer batter to pan, spreading it out into an even layer.
  • Pour remaining half of the melted butter over the top of the batter, brushing it around so it evenly coats the top.
  • Bake for 45-50 minutes, until golden brown and a toothpick inserted into the center comes out clean or with just a few moist crumbs.
  • Whisk together garlic butter topping ingredients (melted butter, parsley and garlic powder) and brush over the top of the loaf when it comes out of the oven.
  • Let bread cool in the pan for 5-7 minutes, brush again with any leftover garlic butter topping, then turn out carefully onto a wire rack to finish cooling.

Want to save this recipe for later? Click the heart in the bottom right corner to save to your own recipe box!

Chef Tips

** can easily be doubled to make two loaves
Bread is great with butter, toasted, or alongside a bowl of chili!

Nutrition Disclaimer

The Chunky Chef is not a dietician or nutritionist, and any nutritional information shared is an estimate. If calorie count and other nutritional values are important to you, we recommend running the ingredients through whichever online nutritional calculator you prefer. Calories can vary quite a bit depending on which brands were used.

Did You Make This?Tag @the_chunky_chef on Instagram and hashtag it #thechunkychef so I can see what you made!
Tag on Insta! Leave a Rating Save for Later Saved!


You May Also Like...

  • It only takes 6 simple ingredients to make this Honey Beer Bread - and NO yeast!  No rising time, just mix and bake! #beerbread #bread #honey #beer #baking #breadmaking #quickbread #pantry
    Honey Beer Bread
  • Homemade garlic bread is so simple to make! Complete with crispy edges, buttery and soft middles and plenty of garlic and herb flavor. Frozen bread doesn’t stand a chance against this garlic bread! #garlicbread #garlic #bread #easyrecipe #homemade #cheesy #cheesybread #italian
    Classic Homemade Garlic Bread
  • The easiest cheesy garlic bread ever! Frozen bread doesn’t stand a chance against this buttery, gooey and toasty bread! #garlicbread #garlic #bread #easyrecipe #homemade #cheesy #cheesybread #italian
    Best Cheesy Garlic Bread
  • Cheesy Garlic Crescent Rolls | Soft, buttery crescent rolls are baked with gooey mozzarella cheese, and brushed with an insanely flavorful garlic and herb butter!  Ready in less than 20 minutes! | http://thechunkychef.com
    Buttery Garlic Cheese Bombs
Previous Post
Next Post

Meet The Chunky Chef

Hey there! I'm Amanda. Wife, mother, photography nerd, and bacon lover! I believe that delicious meals should be easy to make. Now that you’re here, stay a bit, browse a few recipes, and let’s get cookin’!

Learn More

Reader Interactions

Leave a Comment Cancel reply

Have a question? Submit your question, comment, or review below.

Recipe Rating


  1. Melody says

    Posted on 3/19 at 3:26 pm

    Whenever a recipe uses volume measurement for flour, I automatically convert to industry standard of 4.5 ounces of flour per cup. You can measure out flour 10 different times and come up with 10 different weights so for consistent results, weight is better. So for this recipe, I started out with 13 1/2 ounces of flour and I got the Bisquick batter consistency. Didn’t have to do anything else with it. I suspected those who were getting much drier mixes, had too much flour in their one cup. Try measuring my weight. I sent this to work with my husband who took some cauliflower chowder in and he said it went perfectly with it.

    Reply
  2. TerriLynne says

    Posted on 2/11 at 2:56 pm

    Made this with a can of my favorite lager from Wayward Lane Brewing..Schlager. Sprinkled a bit of shredded cheese on top last couple minutes in the oven..served with a pot of old fashioned goulash..crowd pleaser!

    Reply
    • Sylvia says

      Posted on 3/8 at 7:18 pm

      I made this tonight and it is EASY and fabulous. Great flavour. Great texture. Will make again! I sliced some of it after dinner and wrapped for the freezer. Thanks for a great recipe!

      Reply
  3. Andrea says

    Posted on 2/2 at 1:35 am

    I’ve always used a mix when making beer bread but this recipe was amazing!! This was simple and definitely my new go to recipe for beer bread!!

    Reply
  4. Jen says

    Posted on 1/7 at 9:40 pm

    This recipe desperately needs more salt and I would definitely recommend using atleast half a cup of flour less. I normally love beer bread but this recipe wasn’t the best.

    Reply
  5. Stacy Peterson says

    Posted on 10/25 at 4:15 pm

    Made it last night. It’s so good I eat a piece every time I walk by it! I subbed parmesan, dill, dried onion, and garlic powder. Hubs loved it. With these cooking directions, the bread was perfectly done at just short of 50 minutes. I weigh my flour for breads and cakes and it usually turns out well. Thanks for the recipe!

    Reply
    • Raymond Benedict says

      Posted on 12/28 at 10:43 am

      I forgot sugar is that all right

      Reply
      • The Chunky Chef says

        Posted on 12/28 at 8:50 pm

        I’ve only tested this recipe as written. So without testing and retesting it myself, I can’t say for certain how well it will turn out.

        Reply
  6. Katie says

    Posted on 9/14 at 11:39 pm

    I found that this needed *A LITTLE* more beer. My dough was super dry, so opened a second one, added a tad more ….and then had to drink the rest. OHHHH NOOOO!!! 😉

    My flour was probably just less fluffed up than it ought to have been.

    I also sprinkled extra cheese on top, which melted and then got all brown and crispy. 😋

    This baked up beautifully and was fantastically moist. Highly recommended.

    Reply
  7. Courtney says

    Posted on 9/2 at 2:26 am

    Hi,

    Do you use salted or unsalted butter for this recipe?

    Thank you 🙂

    Reply
    • The Chunky Chef says

      Posted on 9/2 at 8:25 pm

      I typically use unsalted 🙂

      Reply
  8. Sally Edington says

    Posted on 5/26 at 11:24 pm

    I made this for a pasta dinner, so I substituted mozzarella cheese for the cheddar and added about 1/2 teaspoon of Italian seasoning to the dough. It was great. Plan to try the original version while we still have this canned beer my husband doesn’t like!

    Reply
  9. Michelle says

    Posted on 5/4 at 2:58 pm

    I love this recipe! I use fresh garlic instead of powder, and since there are just two of us, I slice it when it is completely cooled and freeze it with a bit of parchment between every two slices. That way I can take out what just what we ‘need’ for a meal – otherwise I’d be devouring it all at once!

    Reply
  10. Brenda says

    Posted on 4/28 at 7:30 pm

    I just made this recipe, in fact it’s still in the oven. My question is should
    I have sifted my ingredients? I live in Canada and our beers are more like 16oz. I had to measure it because ours are all metric. The dough was very dry. I had to add the extra beer to make the batter moist. I wondered if I had sifted my flour I might have been lighter and the 12 oz would have moistened all the flour. I did measure carefully so I know I had not put in over the three cups of flour. It sure looks good baking. Can’t wait to try it. I am sure it will be delicious.

    Reply
    • The Chunky Chef says

      Posted on 4/28 at 10:41 pm

      I never sift my flour or dry ingredients for this recipe, and while the batter isn’t supposed to be super wet, it shouldn’t be overly dry either. Hope the finished product turned out well for you 🙂

      Reply
Older Comments

Primary Sidebar

welcome!

Hey there! I'm Amanda. Wife, mother, photography nerd, and bacon lover! I believe that delicious meals should be easy to make. Now that you’re here, stay a bit, browse a few recipes, and let’s get cookin’!

New! Save Recipes To Your Own Account!

Free eBook!

Subscribe & receive my most popular recipes compiled into an easy ebook format!

download now!

Subscribe & Receive My Free Recipe Ebook!

Game Day Recipes!

These crowd-pleasing tender meatballs are smothered in a super flavorful honey garlic bbq sauce.  Perfect for parties, this crockpot meatball recipe couldn't be more simple to make! #meatballs #crockpot #slowcooker #honeygarlic #bbq #appetizer #party #honey #garlic #easyrecipe

Honey Garlic Crockpot Meatballs

2 hours 5 minutes

Smooth and silky queso dip, made using NO velveeta!  Packed with flavor, yet so easy to make, and party ready in just 20 minutes! #queso #dip #cheese #mexican #appetizer #party #cincodemayo #easyrecipe

Queso Dip Recipe

20 minutes

Creamy, cheesy, and oh so addicting, this bacon cheeseburger dip is just like your favorite gooey cheeseburger... but in a party-ready dip form! #bacon #gameday #cheesy #cheeseburger #party #appetizer #dip #easyrecipe

Creamy Bacon Cheeseburger Dip

32 minutes

Insanely tasty chicken wing recipe, dry rubbed, then hickory smoked to perfection.  And don't forget the homemade bourbon bbq sauce! #chickenwings #wingrecipe #smoked #smoker #smokedchickenwings #bourbon #bbq #crispy

Bourbon BBQ Smoked Chicken Wings

3 hours

This easy game day appetizer combines classic buffalo wing flavors with cool creaminess in an easy dip made in the crockpot. Perfect for any party, serve it up with chips or celery sticks and watch everyone go back for seconds!

Buffalo Chicken Dip (Crockpot Recipe)

2 hours 10 minutes

Chicken Taco Mexican Pinwheels | These pinwheels are filled with a creamy chicken taco filling, which is easily customizable, and rolled up to make a perfect appetizer or party food! | http://thechunkychef.com

Chicken Taco Mexican Pinwheels

15 minutes

More Holiday Recipes >

Who doesn’t love free stuff?

Who doesn't love free stuff? Get an ad-free ebook of my most popular recipes, plus be the FIRST to know about new things coming to the site!

Looking for something?

As Seen On…

Stay Connected

subscribe to get new posts via email:

Quick & Easy

Dinner Favorites

Hearty and positively soul-warming, this beef barley soup simmers all day in the slow cooker, which makes for an incredibly rich soup recipe! #beefbarley #soup #slowcooker #crockpot #comfortfood #barley #beefsoup #easyrecipe #dinner
M

Crockpot Beef Barley Soup

white bowl of chicken and dumplings
T

Instant Pot Chicken & Dumplings

HONEY GARLIC SALMON - Succulent and tender salmon filets cooked in a mouthwatering simple honey garlic sauce, then broiled until sticky and caramelized.  Made with simple ingredients, in one pan, and in just 20 minutes! #salmon #honeygarlic #onepan #easyrecipe #dinner #seafood #fish
W

Honey Garlic Glazed Salmon

Light and filling, this Italian Wedding Soup is perfectly delicious comfort food, all year round.  Made in one pan, and ready in 30 minutes, this recipe is great for a weeknight meal! #soup #souprecipe #Italianweddingsoup #onepot #30minutemeal #weeknight #dinner #easyrecipe #homemaderecipe
R

Italian Wedding Soup

This Honey Garlic Chicken is one incredible weeknight dinner idea. Juicy chicken coated and cooked with a glorious sauce made with soy, hoisin, garlic, honey and more! Toss it all in the slow cooker and let it do the work for you! #dinner #chicken #asian #honey #garlic #honeygarlic #easyrecipe #weeknight #slowcooker #crockpot
F

Honey Garlic Chicken

S

Swedish Meatballs

Opens in a new window Opens an external site Opens an external site in a new window
free e-book!

Download MY Free Recipe eBook!

Subscribe & receive my most popular recipes compiled into an easy ebook format!

get my copy!

Subscribe & Receive My Free Recipe Ebook!

As Featured On:

Back to Top

Recipes

Dinners

Appetizers

Desserts

Slow Cooker

Learn to Cook

Start Here

Tips & Tricks

e-Cookbook

Easy Recipes

  • About
  • Work With Me
  • Privacy
  • Contact
© 2023 The Chunky Chef
Site Credits Designed by Melissa Rose Design Developed by Once Coupled
Back to Top