​
  • Skip to primary navigation
  • Skip to main content
  • Skip to primary sidebar
Free Ebook!Subscribe to updates & get a recipe book!

Subscribe & Receive My Free Recipe Ebook!

The Chunky Chef

Comforting Family Recipes

  • All Recipes
  • Learn to Cook
  • Shop
    • My eBooks
    • Favorite Products
  • About
  • Contact
  • Trending:

    Slow Cooker

    Easy Dinners

    Desserts

    My Saved Recipe Box
  • Browse By:
  • Course
    • Appetizers
    • Breakfast
    • Main Dishes
    • Sides
    • Drinks
    • Desserts
    • Salads
    • Soups
    • Sandwiches
    • Healthy-ish
  • Ingredient
    • Chicken
    • Beef
    • Pork
    • Turkey
    • Seafood
    • Meatless
    • Pasta
  • Cuisine
    • Asian
    • Italian
    • Mexican
    • Hawaiian
    • Middle Eastern
    • Comfort Food
  • Method
    • One Pot
    • Crockpot
    • Instant Pot
    • Oven
    • Fried
    • Grilling/BBQ
  • Trending:

    Slow Cooker

    Easy Dinners

    Desserts

Home / Dessert / No Bake

Homemade Rice Krispie Treats

5
/5
45 minutes minutes
10 Comments
Jump to Recipe Print Pin
By: The Chunky Chefpublished: 08/22/2022

This post may contain affiliate links. Please read my disclosure policy.

These Homemade Rice Krispie Treats are such an easy and fun to make no-bake dessert! My version stays soft and gooey, not hard and dry, and uses just 5 simple ingredients.

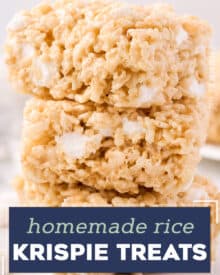
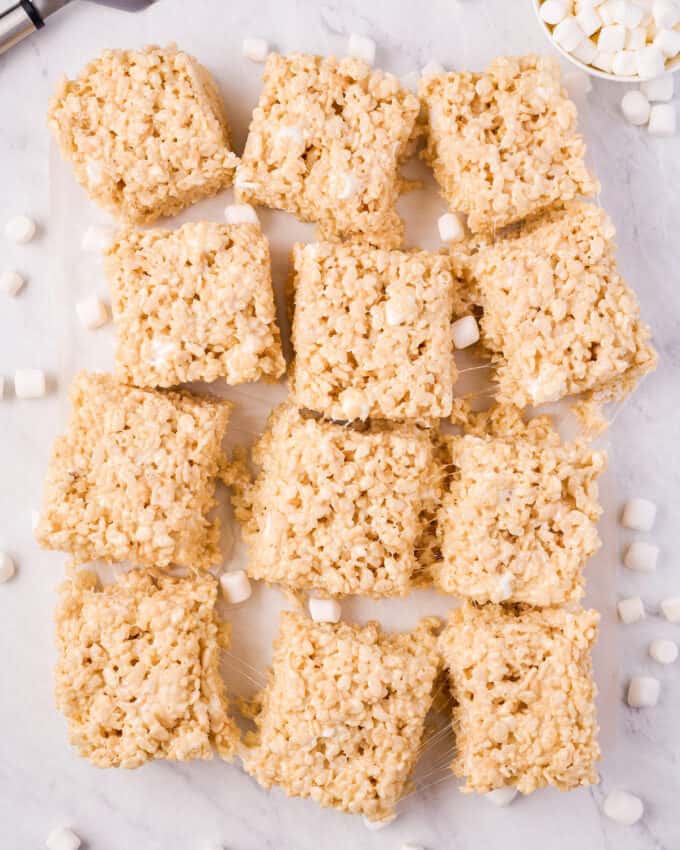
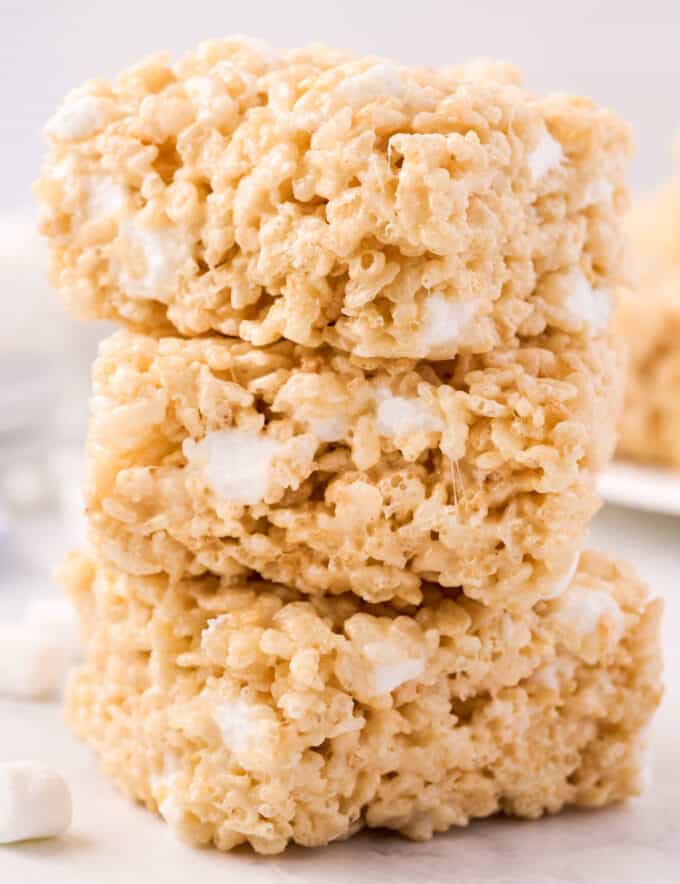
These homemade rice krispie treats are such an easy and fun to make, no-bake dessert! My version stays soft and gooey, not hard and dry, and uses just 5 simple ingredients.

This is one of my No-Bake Dessert recipes I know you’ll want to keep on hand!

rice krispie treat on parchment paper surrounded by other treats and marshmallows
Pin this recipe for later!

As a kid, I loved rice krispie treats. Homemade, store-bought, from restaurants, you name it. But as an adult… nah, who am I kidding, I still love them!

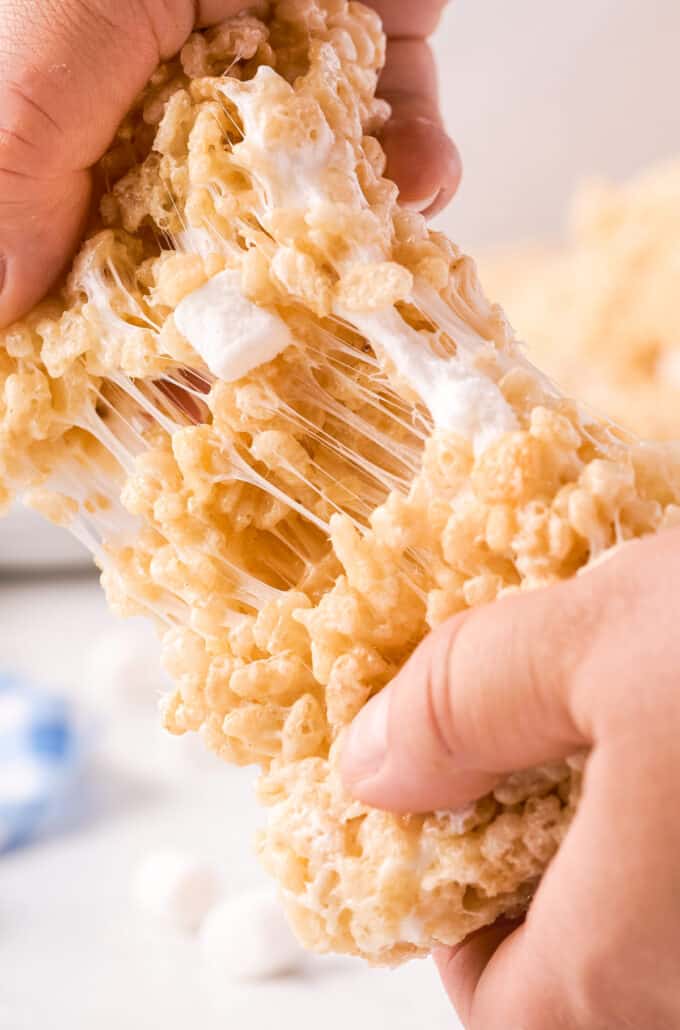
There’s just something absolutely irresistible combination of buttery marshmallow-y gooeyness, and crispy cereal in a portable no-bake dessert!

But I’ve found the store-bought treats are generally pretty hard and dry. There’s just not enough gooeyness for my tastes.

Even the original rice krispie treat recipe on the cereal boxes wasn’t quite doing it for me… so I tweaked and tinkered until I came up with a version that hits the perfect ratio of butter and marshmallow to cereal!

How to make homemade rice krispie treats?

This is just an overview; the full ingredients and directions are in the recipe card toward the bottom of this post.

step by step photos of how to make rice krispie treats
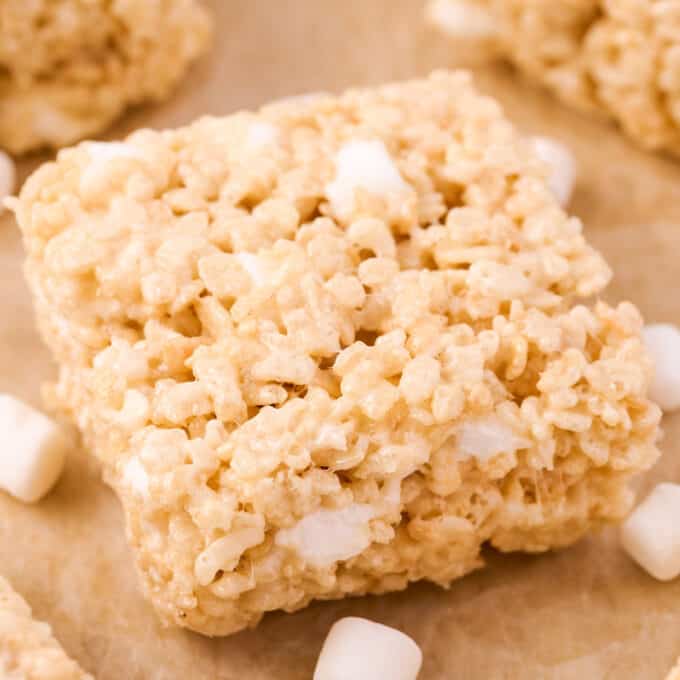
  1. Melt butter. I recommend a large pot for this, so you can stir everything in the pot and not have to dirty another bowl.
  2. Add marshmallows and melt. Make sure to do this over LOW heat, otherwise you might end up with hard krispie treats.
  3. Stir in cereal and marshmallows. This may take a little elbow grease, since everything is sticky, but it’s worth it in the end.
  4. Press into pan. Do this lightly, so they’re not super compacted.
  5. Let set. The treats need to set for about 30 minutes, to cool and really stick together.

Helpful Tip!

When making rice krispie treats, be sure to use fresh marshmallows. When marshmallows are old and hard, they have hardly any moisture left, and they won’t melt nearly as well.

using a spatula to take a rice krispie treat out of the baking dish

Variations of this recipe

  • Frosted – while I haven’t tested this recipe using the frosted rice krispies cereal, it should work out well if you’d like to try it.
  • Other cereals – for a fun twist, try using fruity pebbles, cocoa pebbles (or cocoa krispies), or the cinnamon sugar rice krispies. Any cereal that’s around the same size and shape of original rice krispies will work.
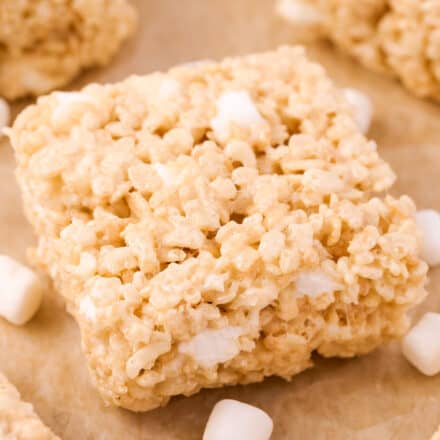
  • Marshmallow size – any size marshmallows will work for this recipe, you just want 32 oz of marshmallows. However, if you’re using the larger size, you’ll need to cut 3 cups of them up into small pieces (for stirring into the treats).
  • Shapes – feel free to cut these treats into any shapes you’d like! This is fun to do for seasonal holidays.
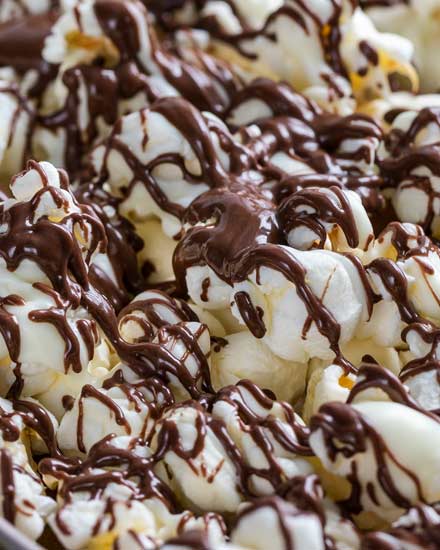
  • Chocolate – for some extra fun and decadence, try drizzling the treats with melted chocolate!
twelve krispie treat squares on marble counter with mini marshmallows scattered around

FAQ’s

Do rice krispie treats need to be refrigerated?

Nope, they’re perfectly fine kept at room temperature. In fact, refrigerating them can cause them to dry out more quickly, and lose that gooey texture we all love.

Why are my rice krispie treats hard?

In general, it could be a number of things; not enough butter, too much cereal, not enough marshmallows, or heating the marshmallows at too high of a temperature. This recipe was carefully crafted to have the perfect ratio of butter, cereal, and marshmallows, so the most likely culprit is the heat. Heating over too high of a temperature can turn it into an almost toffee-like mixture, which will be very hard when cooled.

How do I keep rice krispie treats from sticking to my hand when making them?

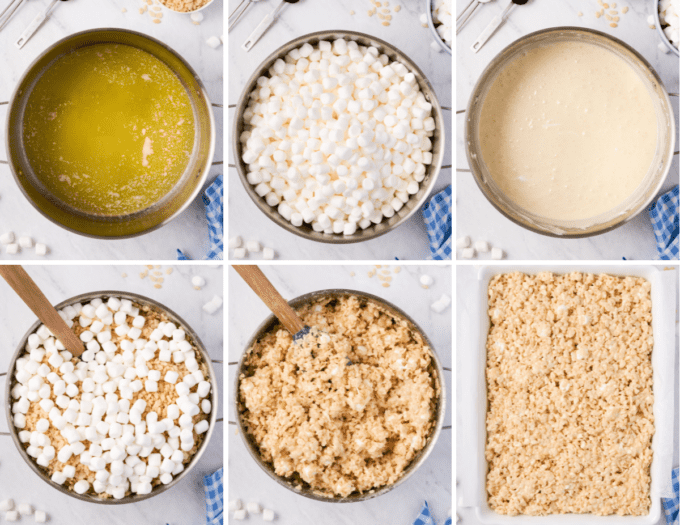
With all the gooey marshmallows, it’s no surprise that they’re sticky. I’ve found the best way to avoid having half of the mixture sticking to your hands, is to spray your palms lightly with nonstick cooking spray before pressing the mixture into the pan.

Making rice krispie treats ahead of time

Even though these treats don’t take long to make, and require no baking, you can make them entirely ahead of time.

I don’t advise doing so more than 2-3 days ahead, or they can start to get dry.

pulling apart a rice krispie treat showing the gooey marshmallows

Freezing

Did you know you can freeze rice krispie treats?

Let the treats cool completely, then wrap each square individually in wax paper, plastic wrap, foil, etc, and store in a freezer-safe container for up to 2-3 months.

Thaw in the refrigerator and enjoy!

Storage

Rice krispie treats should be stored in an airtight container at room temperature for 3-4 days.

To make them taste even fresher, wrap each individual square treat in plastic wrap and store in an airtight container at room temperature.

More No-Bake Desserts:

funfetti dip
Funfetti Cake Batter Dip
chocolate covered strawberry drizzled with white chocolate
Chocolate Covered Strawberries
sugar cookie truffles in white bowl
Sugar Cookie Truffles
pile of chocolate covered oreos in basket with heart stamped paper for valentine's day
Chocolate Covered Oreos
These Homemade Rice Krispie Treats are such an easy and fun to make no-bake dessert! My version stays soft and gooey, not hard and dry, and uses just 5 simple ingredients.
spatula

My Favorite Rubber Spatula!

I’ve had a set just like this for years and they’ve held up really well! Rubber spatulas make stirring the cereal into the sticky marshmallow mixture a lot easier.

Get on amazon

Did you make this? Be sure to leave a review below and tag me @the_chunky_chef on Facebook and Instagram!

rice krispie treat on parchment paper surrounded by other treats and marshmallows

Homemade Rice Krispie Treats

5 from 7 votes
Author: The Chunky Chef
Prep Time: 5 minutes minutes
Cook Time: 10 minutes minutes
Setting Time: 30 minutes minutes
Total Time: 45 minutes minutes
Calories: 450
Servings: 12 servings
(hover over # to adjust)
Print Rate Pin
These Homemade Rice Krispie Treats are such an easy and fun to make no-bake dessert! My version stays soft and gooey, not hard and dry, and uses just 5 simple ingredients.

Ingredients

  • 3/4 cup unsalted butter (12 Tbsp)
  • 32 oz mini marshmallows I use 2 (16 oz each) bags
  • 1/2 tsp kosher salt
  • 1 tsp vanilla extract optional but recommended
  • 12 cups rice krispies cereal (I find this is equivalent to a 12 oz box)

Instructions

Prepare

  • Line a 9×13” baking pan with foil or parchment paper, then spray with nonstick cooking spray.  Set aside.
  • Measure out 3 cups of the mini marshmallows and set those aside.

Melt butter and marshmallows

  • Add butter to a large stockpot or saucepan, then heat over MED heat.  Once butter is melted, add all the remaining marshmallows (except for the 3 cups you measured out already).  Reduce heat to LOW and stir until completely melted.
  • Stir in salt and vanilla, then remove from heat.

Combine

  • ** I find that lightly spraying a rubber spatula with nonstick spray helps with the cereal not clumping up too much on the spatula as you stir. **
  • Add cereal and the 3 cups of marshmallows you set aside, stirring until all the cereal is coated.

Assemble

  • Transfer mixture to the prepared baking pan.  Spray your hands lightly with nonstick cooking spray, then gently press into the pan, until evenly spread out.  ** Try not to press too hard, or they’ll be so tightly compacted they’ll be hard to eat.  You want to use the least amount of force necessary to spread them into the pan. **

Set and serve

  • Let sit at room temperature for 30 minutes to an hour.  Then lift the bars out of the pan using the foil or parchment paper and slice into squares or desired shapes.

Want to save this recipe for later? Click the heart in the bottom right corner to save to your own recipe box!

Chef Tips

  1. Serving size is up to you, but I usually slice the panful of treats into 12 squares. Calorie information provided is for 1/12 of the pan.
  2. The 3/4 of butter can also be measured as 12 Tbsp or 1.5 sticks (for my US readers).

Nutrition Disclaimer

The Chunky Chef is not a dietician or nutritionist, and any nutritional information shared is an estimate. If calorie count and other nutritional values are important to you, we recommend running the ingredients through whichever online nutritional calculator you prefer. Calories can vary quite a bit depending on which brands were used.

Did You Make This?Tag @the_chunky_chef on Instagram and hashtag it #thechunkychef so I can see what you made!
Tag on Insta! Leave a Rating Save for Later Saved!

You May Also Like...

  • Chocolate covered popcorn made with both white and dark chocolate.  This easy, 5 minute snack recipe is the perfect combination of sweet and salty! #snack #popcorn #chocolate #easyrecipe #zebrapopcorn #popcornrecipe 
    Chocolate Covered Popcorn
  • Easy Baked Mexican Rice | This foolproof method for cooking rice tastes just like the rice from your favorite Mexican restaurant... full of flavor and cooked to perfectly fluffy perfection! | http://thechunkychef.com
    Easy Baked Mexican Rice
  • Classic Oreo cookies, completely coated in silky tinted white chocolate, then decorated with colorful and fun sprinkles and drizzles of more chocolate. This simple no-bake dessert recipe uses minimal ingredients, is easy enough for kids to make, and can be decorated for any holiday or event! #dessert #nobake #oreo
    Chocolate Covered Oreos
  • Learn how to make classic Chocolate Covered Strawberries at home, using just 4 simple ingredients and minimal effort! Plus directions for different topping options and how to make a fun boozy version! #strawberries #chocolate #dessert #nobake
    Chocolate Covered Strawberries
Previous Post
Next Post

Meet The Chunky Chef

Hey there! I'm Amanda. Wife, mother, photography nerd, and bacon lover! I believe that delicious meals should be easy to make. Now that you’re here, stay a bit, browse a few recipes, and let’s get cookin’!

Learn More

Reader Interactions

Leave a Comment Cancel reply

Have a question? Submit your question, comment, or review below.

Recipe Rating


  1. Amariah says

    Posted on 12/27 at 11:47 pm

    So Gooey and OH So Delicious! Will be making again soon!

    Reply
  2. Catalina says

    Posted on 8/24 at 1:58 pm

    This is such a delicious treat. My kids love it so much!

    Reply
  3. Erik says

    Posted on 8/24 at 12:21 pm

    Such a classic, one of my favorite treats!

    Reply
  4. Erin | Dinners, Dishes and Dessert says

    Posted on 8/24 at 5:45 am

    Looks so hard to resist! You had me on this!

    Reply
  5. Juliane says

    Posted on 8/24 at 12:40 am

    Such a delicious treat! Will surely try this!

    Reply
  6. Sandra says

    Posted on 8/23 at 11:08 pm

    These are my kid’s new favorite treats! Good thing they’re so easy to make!

    Reply
  7. Beth says

    Posted on 8/23 at 1:26 pm

    I love this little twist of adding whole mini marshmallows to the treats. It’s such a simple thing but it really adds a little more gooey deliciousness.

    Reply
  8. Linda says

    Posted on 8/23 at 12:15 am

    These are the bomb. Try browning the butter. It gives a nutty flavor. Been making these for over 40 years.

    Reply
  9. Liz Maresh says

    Posted on 8/23 at 12:14 am

    Can I give you my way of keeping Rice Krispie treats from sticking to your hands ? I use a sheet of parchment paper to press the mixture down . It doesn’t stick to the parchment either !

    Reply
    • The Chunky Chef says

      Posted on 8/23 at 9:03 am

      Such a great tip!

      Reply

Primary Sidebar

welcome!

Hey there! I'm Amanda. Wife, mother, photography nerd, and bacon lover! I believe that delicious meals should be easy to make. Now that you’re here, stay a bit, browse a few recipes, and let’s get cookin’!

New! Save Recipes To Your Own Account!

Free eBook!

Subscribe & receive my most popular recipes compiled into an easy ebook format!

download now!

Subscribe & Receive My Free Recipe Ebook!

Game Day Recipes!

These crowd-pleasing tender meatballs are smothered in a super flavorful honey garlic bbq sauce.  Perfect for parties, this crockpot meatball recipe couldn't be more simple to make! #meatballs #crockpot #slowcooker #honeygarlic #bbq #appetizer #party #honey #garlic #easyrecipe

Honey Garlic Crockpot Meatballs

2 hours hours 5 minutes minutes

Smooth and silky queso dip, made using NO velveeta!  Packed with flavor, yet so easy to make, and party ready in just 20 minutes! #queso #dip #cheese #mexican #appetizer #party #cincodemayo #easyrecipe

Queso Dip Recipe

20 minutes minutes

Creamy, cheesy, and oh so addicting, this bacon cheeseburger dip is just like your favorite gooey cheeseburger... but in a party-ready dip form! #bacon #gameday #cheesy #cheeseburger #party #appetizer #dip #easyrecipe

Creamy Bacon Cheeseburger Dip

32 minutes minutes

Insanely tasty chicken wing recipe, dry rubbed, then hickory smoked to perfection.  And don't forget the homemade bourbon bbq sauce! #chickenwings #wingrecipe #smoked #smoker #smokedchickenwings #bourbon #bbq #crispy

Bourbon BBQ Smoked Chicken Wings

3 hours hours

This easy game day appetizer combines classic buffalo wing flavors with cool creaminess in an easy dip made in the crockpot. Perfect for any party, serve it up with chips or celery sticks and watch everyone go back for seconds!

Buffalo Chicken Dip (Crockpot Recipe)

2 hours hours 10 minutes minutes

Chicken Taco Mexican Pinwheels | These pinwheels are filled with a creamy chicken taco filling, which is easily customizable, and rolled up to make a perfect appetizer or party food! | http://thechunkychef.com

Chicken Taco Mexican Pinwheels

15 minutes minutes

More Holiday Recipes >

Who doesn’t love free stuff?

Who doesn't love free stuff? Get an ad-free ebook of my most popular recipes, plus be the FIRST to know about new things coming to the site!

Looking for something?

As Seen On…

Stay Connected

subscribe to get new posts via email:

Quick & Easy

Dinner Favorites

Hearty and positively soul-warming, this beef barley soup simmers all day in the slow cooker, which makes for an incredibly rich soup recipe! #beefbarley #soup #slowcooker #crockpot #comfortfood #barley #beefsoup #easyrecipe #dinner
M

Crockpot Beef Barley Soup

white bowl of chicken and dumplings
T

Instant Pot Chicken & Dumplings

HONEY GARLIC SALMON - Succulent and tender salmon filets cooked in a mouthwatering simple honey garlic sauce, then broiled until sticky and caramelized.  Made with simple ingredients, in one pan, and in just 20 minutes! #salmon #honeygarlic #onepan #easyrecipe #dinner #seafood #fish
W

Honey Garlic Glazed Salmon

Light and filling, this Italian Wedding Soup is perfectly delicious comfort food, all year round.  Made in one pan, and ready in 30 minutes, this recipe is great for a weeknight meal! #soup #souprecipe #Italianweddingsoup #onepot #30minutemeal #weeknight #dinner #easyrecipe #homemaderecipe
R

Italian Wedding Soup

This Honey Garlic Chicken is one incredible weeknight dinner idea. Juicy chicken coated and cooked with a glorious sauce made with soy, hoisin, garlic, honey and more! Toss it all in the slow cooker and let it do the work for you! #dinner #chicken #asian #honey #garlic #honeygarlic #easyrecipe #weeknight #slowcooker #crockpot
F

Honey Garlic Chicken

S

Swedish Meatballs

Opens in a new window Opens an external site Opens an external site in a new window
free e-book!

Download MY Free Recipe eBook!

Subscribe & receive my most popular recipes compiled into an easy ebook format!

get my copy!

Subscribe & Receive My Free Recipe Ebook!

As Featured On:

Back to Top

Recipes

Dinners

Appetizers

Desserts

Slow Cooker

Learn to Cook

Start Here

Tips & Tricks

e-Cookbook

Easy Recipes

  • About
  • Work With Me
  • Privacy
  • Contact
© 2023 The Chunky Chef
Site Credits Designed by Melissa Rose Design Developed by Once Coupled
Back to Top