• Skip to primary navigation
  • Skip to main content
  • Skip to primary sidebar
Free Ebook!Subscribe to updates & get a recipe book!

Subscribe & Receive My Free Recipe Ebook!

The Chunky Chef

Comforting Family Recipes

  • All Recipes
  • Learn to Cook
  • Shop
    • My eBooks
    • Favorite Products
  • About
  • Contact
  • Trending:

    Slow Cooker

    Easy Dinners

    Desserts

    My Saved Recipe Box
  • Browse By:
  • Course
    • Appetizers
    • Breakfast
    • Main Dishes
    • Sides
    • Drinks
    • Desserts
    • Salads
    • Soups
    • Sandwiches
    • Healthy-ish
  • Ingredient
    • Chicken
    • Beef
    • Pork
    • Turkey
    • Seafood
    • Meatless
    • Pasta
  • Cuisine
    • Asian
    • Italian
    • Mexican
    • Hawaiian
    • Middle Eastern
    • Comfort Food
  • Method
    • One Pot
    • Crockpot
    • Instant Pot
    • Oven
    • Fried
    • Grilling/BBQ
  • Trending:

    Slow Cooker

    Easy Dinners

    Desserts

Home / Dessert

Baked “Fried” Oreos

5
/5
17 minutes
8 Comments
Jump to Recipe Print Pin
By: The Chunky Chefpublished: 01/25/2021

This post may contain affiliate links. Please read my disclosure policy.

With just 2 base ingredients (plus a totally optional ingredient or two), these baked "fried" Oreos are an easier (and much less oily) version of your favorite fair food!  This amazing dessert is sure to be a family favorite! #oreo #fried #baked #fairfood #dessert #dessertrecipe

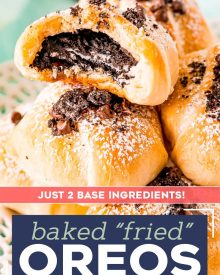
With just 2 base ingredients (plus a totally optional ingredient or two), these baked “fried” Oreos are an easier (and much less oily) version of your favorite fair food!  This amazing dessert is sure to be a family favorite! 

These Baked “Fried” Oreos recipe is such a fun, easy dessert, and SO delicious!  We love quick and simple desserts, like my Bourbon Vanilla Ice Cream (no churn), and French Silk Pie Brownies.   This is one of my Dessert recipes you’ll definitely want in your collection!

holding a fried oreo with a bite taken out of it

Fried Oreos Recipe

We may be in the thick of Winter, but I’m dreaming of warmer weather.  Specifically summer.  Which is honestly strange, because I’m definitely a cold weather person!

But what is drawing me to the summertime is the fairs.  Hopefully we’ll be allowed to have them this year, because I’m craving me some fair food!

Fairs are fun for all sorts of reasons… the animals, shops, people-watching… but the food is just second to none.

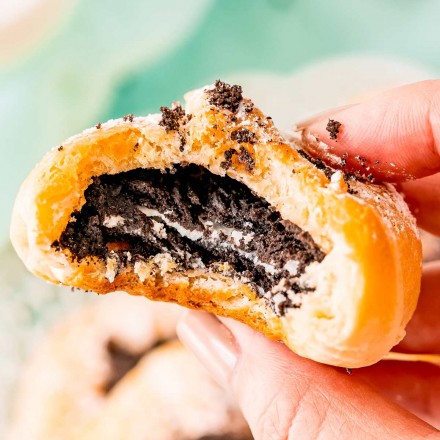
Fried, gooey goodness!  While these baked “fried” Oreos are deep fried, they hit a lot of those yummy flavor notes.  Plus, they’re relatively mess-free, hassle-free, and are a bit healthier.

Okay, not really healthy… but a touch healthier.  I mean it’s still a cookie wrapped in a pastry-like coating, but at least it’s not those things plus being fried in tons of oil!

Speaking of fair foods, I was thinking of creating a series of recipes here in the early Summer that will be all about those foods you find at the fairs.  Funnel cakes, elephant ears, corn dogs, chili dogs, and more.  So that way you can make your favorites at home, whenever you want them!

What do you think?  Let me know in the comments if that’s a series of recipes you’d be interested in seeing!

How to make baked “fried” Oreos

step by step how to make baked fried oreos

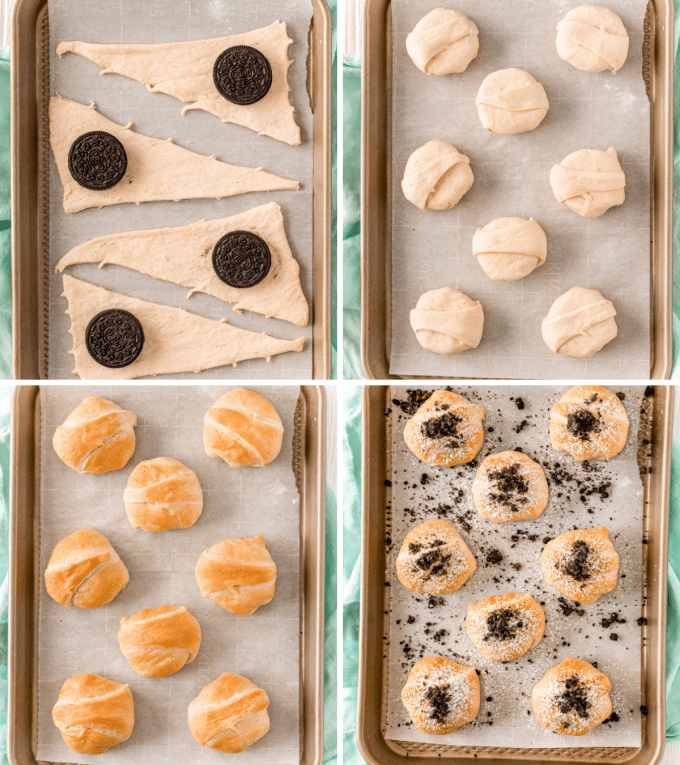
  1. Preheat oven.  Preheat oven to 425°F.  Line baking sheet with parchment paper for easy clean up.
  2. Prepare crescent rolls.  Open can of crescent rolls, unroll the dough, and separate into triangles along the perforated lines.  You should have 8.
  3. Wrap Oreos.  Add Oreo cookie to wider end of the triangle.  Wrap and pinch the dough around the cookie.
  4. Bake.  Add Oreos to baking sheet, about 2 inches apart.  Bake for 10-12 minutes, until golden brown.
  5. Garnish.  If desired, dust with powdered sugar, top with a crushed Oreo pieces, and/or mini chocolate chips.

Additional cooking tips

Air fryer

I haven’t specifically tested this recipe in my air fryer, so I can’t speak to what temperature to fry at or how long to cook.  I do feel this recipe would do well in an air fryer, so if you feel adventurous, give it a try and let me know how it went!

baked oreos on baking sheet

Alternate wrapping

Rather than wrapping up the Oreo cookie like a traditional crescent roll, you can alternatively not unroll the crescent roll dough at all.  When you open the can, keep the dough rolled up in the can shape, then using a sharp knife, slice the log into 8 equal-sized pieces.

Smush those pieces into a circular shape, then place a cookie in the center.  Wrap the dough up around it.  Continue with recipe as directed.

Thinner dough

Using the slicing technique described just above, slice the dough into 16 equal-sized pieces and use 16 Oreo cookies.  Then when you wrap the cookies, the dough will naturally be thinner.

pyramid stack of baked fried oreos on cake stand

Variations of this recipe

  • Softer texture – if you prefer a softer texture to the cookie inside, try dunking the Oreo in some milk before wrapping it up.
  • Flavored Oreos – nowadays there are SO many flavors of Oreos; I can’t keep up!  Feel free to try out this recipe with your favorite flavor of cookie.
  • Extra chocolate – chocolate lover?  Try dipping the cookie in some melted chocolate before wrapping it!
  • Glaze – instead of the optional powdered sugar dusted over the top, try mixing  1/2 cup of powdered sugar with a Tbsp or so of heavy cream.  Whisk until it’s smooth, then drizzle that over the baked Oreos!

With just 2 base ingredients (plus a totally optional ingredient or two), these baked "fried" Oreos are an easier (and much less oily) version of your favorite fair food!  This amazing dessert is sure to be a family favorite! #oreo #fried #baked #fairfood #dessert #dessertrecipe

Making baked/fried Oreos ahead of time

Personally, I think these are best served right out of the oven.  Just like deep fried food, you want to eat it while it’s warm and fresh, right?

They won’t be awful later on, but just not as good.

However, you can absolutely assemble them ahead of time!  Just add them to the baking sheet and cover it with foil (so the crescents don’t dry out), and keep refrigerated until you’re ready to bake!

Storage

Leftover baked Oreos should be refrigerated in an airtight container and consumed within 3 days.

To re-warm/crisp, add to a baking sheet and bake in a preheated 325°F oven until crisp and warm.

baked fried oreo cookie with bite taken out of it

Shop the recipe

  • Baking Sheets – I love the large size and how sturdy these pans are.
  • Parchment Paper – no cutting required, these sheets fit perfectly in the baking sheets above.

Be sure to scroll down to check out other readers’ comments for tips and reviews.

And don’t forget, if you’ve made this recipe, please consider leaving a comment and star rating to let me know how you enjoyed it!

Did you make this? Be sure to leave a review below and tag me @the_chunky_chef on Facebook and Instagram!

holding a fried oreo with a bite taken out of it

Baked "Fried" Oreos

5 from 7 votes
Author: The Chunky Chef
Prep Time: 5 minutes
Cook Time: 12 minutes
Total Time: 17 minutes
Calories: 156
Servings: 8 oreos
(hover over # to adjust)
Print Rate Pin
With just 2 base ingredients (plus a totally optional ingredient or two), these baked "fried" Oreos are an easier (and much less oily) version of your favorite fair food! 

Ingredients

  • 8 Oreo cookies plus an additional cookie for making crushed topping (if using)
  • 8 oz can crescent rolls
  • powdered sugar optional
  • mini chocolate chips optional
  • crushed Oreo cookie optional

Instructions

  • Preheat oven to 425°F. Line a baking sheet with parchment paper and set aside.
  • Open can of crescent rolls, unroll, then separate into triangles along the perforated lines.
  • Add an Oreo cookie to the wide end of a triangle of dough. Wrap towards the skinny end, wrapping and pinching to cover the cookie. Repeat with remaining Oreos and dough triangles.
  • Add Oreo crescents on prepared baking sheet, about 2 inches apart. Bake for 10-12 minutes, until golden brown.
  • Remove from oven and serve immediately, or garnish with a dusting of powdered sugar, crushed Oreo cookie pieces and/or mini chocolate chips.

Want to save this recipe for later? Click the heart in the bottom right corner to save to your own recipe box!

Chef Tips

Air fryer
I haven't specifically tested this recipe in my air fryer, so I can't speak to what temperature to fry at or how long to cook.  I do feel this recipe would do well in an air fryer, so if you feel adventurous, give it a try and let me know how it went!
Alternate wrapping
Rather than wrapping up the Oreo cookie like a traditional crescent roll, you can alternatively not unroll the crescent roll dough at all.  When you open the can, keep the dough rolled up in the can shape, then using a sharp knife, slice the log into 8 equal-sized pieces.
Smush those pieces into a circular shape, then place a cookie in the center.  Wrap the dough up around it.  Continue with recipe as directed.
Thinner dough
Using the slicing technique described just above, slice the dough into 16 equal-sized pieces and use 16 Oreo cookies.  Then when you wrap the cookies, the dough will naturally be thinner

Nutrition Disclaimer

The Chunky Chef is not a dietician or nutritionist, and any nutritional information shared is an estimate. If calorie count and other nutritional values are important to you, we recommend running the ingredients through whichever online nutritional calculator you prefer. Calories can vary quite a bit depending on which brands were used.

Did You Make This?Tag @the_chunky_chef on Instagram and hashtag it #thechunkychef so I can see what you made!
Tag on Insta! Leave a Rating Save for Later Saved!

Any nutritional information shared is an estimate, and is automatically calculated through a program.  If calorie count is important to you, I recommend running the ingredients through whichever online nutritional calculator you prefer.  Calories can vary quite a bit depending on which brands were used.


The Chunky Chef is not a nutritionist and doesn’t provide full nutritional information for recipes as there is a potential for error and we wouldn’t want to potentially and/or unknowingly pass along incorrect information.


You May Also Like...

  • Oven Baked BBQ Chicken Pizza Nachos | Oven baked BBQ chicken pizza nachos... the awesome combination of homemade bbq sauce, juicy chicken, gooey cheese and tons of toppings! | http://thechunkychef.com
    Oven Baked BBQ Chicken Pizza Nachos
  • This Classic Buttermilk Fried Chicken recipe is incredibly flavorful and juicy, from a hot sauce/buttermilk marinade and a seasoned flour dredge.  Soon to be your family's new favorite chicken recipe! #chicken #fried #buttermilk #friedchicken #southern #chickenrecipes #dinner
    Classic Buttermilk Fried Chicken
  • featured image for baked chicken tacos
    Cheesy Baked Chicken Tacos
  • Baked Italian Beef Sliders | Slider buns are piled high with shredded Italian beef and gooey provolone cheese, brushed with melted garlic butter and baked until gooey and mouthwatering! | http://thechunkychef.com
    Baked Italian Beef Sliders
Previous Post
Next Post

Meet The Chunky Chef

Hey there! I'm Amanda. Wife, mother, photography nerd, and bacon lover! I believe that delicious meals should be easy to make. Now that you’re here, stay a bit, browse a few recipes, and let’s get cookin’!

Learn More

Reader Interactions

Leave a Comment Cancel reply

Have a question? Submit your question, comment, or review below.

Recipe Rating


  1. PJT says

    Posted on 10/9 at 9:00 pm

    My kids definitely give this a thumbs up! We tried both regular Oreos and blonde Oreos. Both turned out great! Didn’t even need powdered sugar! So easy! Much easier than dragging out my airfryer.

    Reply
  2. Sandra says

    Posted on 1/30 at 3:12 pm

    My kids loved it so much!! They can’t stop eating it!

    Reply
  3. Toni says

    Posted on 1/28 at 1:02 am

    This is such an amazing treat!! My kids enjoyed helping while baking!

    Reply
  4. Amanda Livesay says

    Posted on 1/27 at 11:41 pm

    Oh my gosh, these are incredible! And very, very dangerous! I could eat the whole batch.

    Reply
  5. Beti | easyweeknightrecipes says

    Posted on 1/27 at 2:10 pm

    My family would love these Baked Fried Oreos!! They are amazing!

    Reply
  6. katerina @ diethood.com says

    Posted on 1/27 at 2:09 pm

    Oh my, these look SO GOOD! I can’t wait to try them!

    Reply
  7. Allyson Zea says

    Posted on 1/27 at 11:27 am

    I started making these when I saw them on TickTock in the air fryer, and it’s so great!

    Reply
  8. Erin | Dinners,Dishes and Dessert says

    Posted on 1/27 at 4:19 am

    These Baked “Fried” Oreos are just so adorable!!

    Reply

Primary Sidebar

welcome!

Hey there! I'm Amanda. Wife, mother, photography nerd, and bacon lover! I believe that delicious meals should be easy to make. Now that you’re here, stay a bit, browse a few recipes, and let’s get cookin’!

New! Save Recipes To Your Own Account!

Free eBook!

Subscribe & receive my most popular recipes compiled into an easy ebook format!

download now!

Subscribe & Receive My Free Recipe Ebook!

Game Day Recipes!

These crowd-pleasing tender meatballs are smothered in a super flavorful honey garlic bbq sauce.  Perfect for parties, this crockpot meatball recipe couldn't be more simple to make! #meatballs #crockpot #slowcooker #honeygarlic #bbq #appetizer #party #honey #garlic #easyrecipe

Honey Garlic Crockpot Meatballs

2 hours 5 minutes

Smooth and silky queso dip, made using NO velveeta!  Packed with flavor, yet so easy to make, and party ready in just 20 minutes! #queso #dip #cheese #mexican #appetizer #party #cincodemayo #easyrecipe

Queso Dip Recipe

20 minutes

Creamy, cheesy, and oh so addicting, this bacon cheeseburger dip is just like your favorite gooey cheeseburger... but in a party-ready dip form! #bacon #gameday #cheesy #cheeseburger #party #appetizer #dip #easyrecipe

Creamy Bacon Cheeseburger Dip

32 minutes

Insanely tasty chicken wing recipe, dry rubbed, then hickory smoked to perfection.  And don't forget the homemade bourbon bbq sauce! #chickenwings #wingrecipe #smoked #smoker #smokedchickenwings #bourbon #bbq #crispy

Bourbon BBQ Smoked Chicken Wings

3 hours

This easy game day appetizer combines classic buffalo wing flavors with cool creaminess in an easy dip made in the crockpot. Perfect for any party, serve it up with chips or celery sticks and watch everyone go back for seconds!

Buffalo Chicken Dip (Crockpot Recipe)

2 hours 10 minutes

Chicken Taco Mexican Pinwheels | These pinwheels are filled with a creamy chicken taco filling, which is easily customizable, and rolled up to make a perfect appetizer or party food! | http://thechunkychef.com

Chicken Taco Mexican Pinwheels

15 minutes

More Holiday Recipes >

Who doesn’t love free stuff?

Who doesn't love free stuff? Get an ad-free ebook of my most popular recipes, plus be the FIRST to know about new things coming to the site!

Looking for something?

As Seen On…

Stay Connected

subscribe to get new posts via email:

Quick & Easy

Dinner Favorites

Hearty and positively soul-warming, this beef barley soup simmers all day in the slow cooker, which makes for an incredibly rich soup recipe! #beefbarley #soup #slowcooker #crockpot #comfortfood #barley #beefsoup #easyrecipe #dinner
M

Crockpot Beef Barley Soup

white bowl of chicken and dumplings
T

Instant Pot Chicken & Dumplings

HONEY GARLIC SALMON - Succulent and tender salmon filets cooked in a mouthwatering simple honey garlic sauce, then broiled until sticky and caramelized.  Made with simple ingredients, in one pan, and in just 20 minutes! #salmon #honeygarlic #onepan #easyrecipe #dinner #seafood #fish
W

Honey Garlic Glazed Salmon

Light and filling, this Italian Wedding Soup is perfectly delicious comfort food, all year round.  Made in one pan, and ready in 30 minutes, this recipe is great for a weeknight meal! #soup #souprecipe #Italianweddingsoup #onepot #30minutemeal #weeknight #dinner #easyrecipe #homemaderecipe
R

Italian Wedding Soup

This Honey Garlic Chicken is one incredible weeknight dinner idea. Juicy chicken coated and cooked with a glorious sauce made with soy, hoisin, garlic, honey and more! Toss it all in the slow cooker and let it do the work for you! #dinner #chicken #asian #honey #garlic #honeygarlic #easyrecipe #weeknight #slowcooker #crockpot
F

Honey Garlic Chicken

S

Swedish Meatballs

Opens in a new window Opens an external site Opens an external site in a new window
free e-book!

Download MY Free Recipe eBook!

Subscribe & receive my most popular recipes compiled into an easy ebook format!

get my copy!

Subscribe & Receive My Free Recipe Ebook!

As Featured On:

Back to Top

Recipes

Dinners

Appetizers

Desserts

Slow Cooker

Learn to Cook

Start Here

Tips & Tricks

e-Cookbook

Easy Recipes

  • About
  • Work With Me
  • Privacy
  • Contact
© 2023 The Chunky Chef
Site Credits Designed by Melissa Rose Design Developed by Once Coupled
Back to Top