

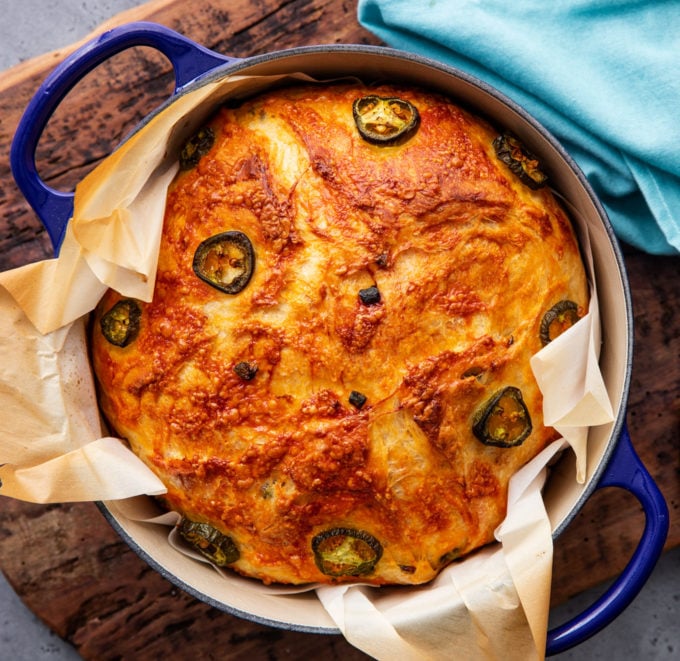
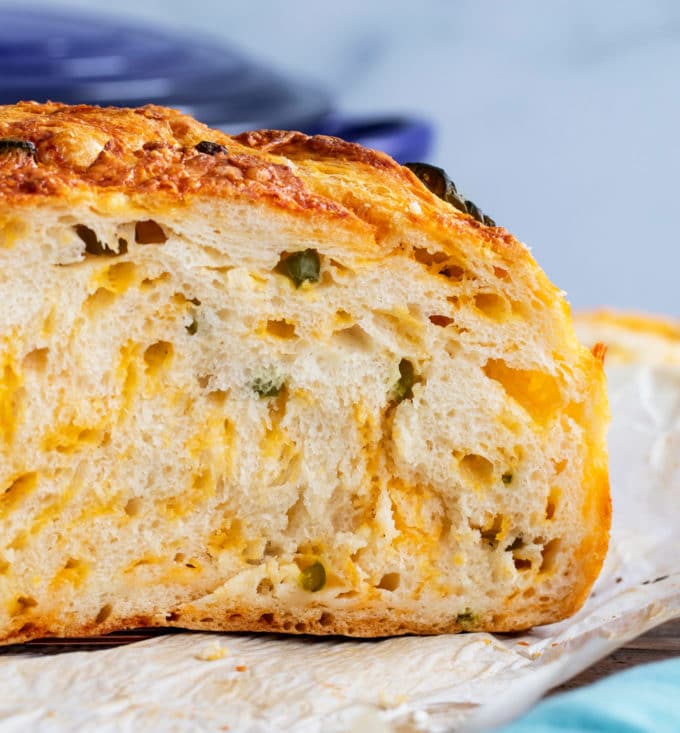
Jalapeno Cheddar Dutch Oven Bread is perfectly crusty on the outside, with a soft fluffy inside, and is made using simple ingredients. Deliciously savory with a bit of spice, it’s perfect with a pat of butter, or for grilled cheese! Plus, this dough doesn’t have to sit overnight, so you don’t have to plan ahead to have great bread.
This Jalapeno Cheddar Dutch Oven Bread is one of those recipes that is so fun to make. We also love easy bread recipes like my original No Knead Bread and Honey Beer Bread. This is one of my Bread Recipes I know you’ll want to keep on hand!
DUTCH OVEN BREAD RECIPE
Are you a fan of those breads from the bakery, you know, the one’s with that deliciously crunchy crust and soft, fluffy inside?
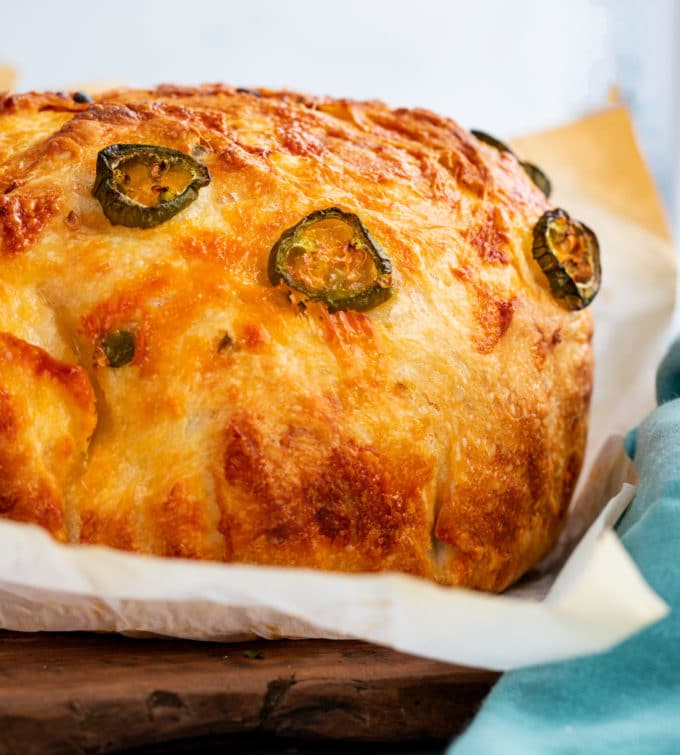
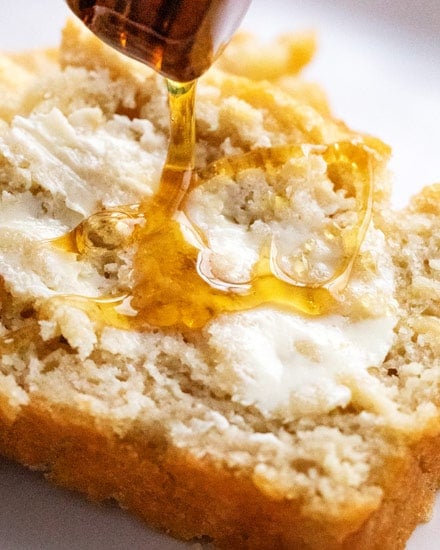
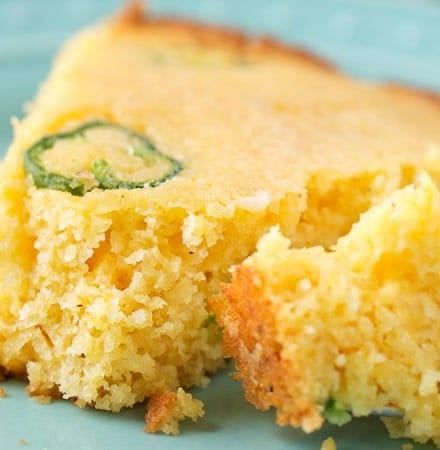
Yep, this bread tastes just like that. Except with plenty of sharp cheddar cheese and jalapenos!
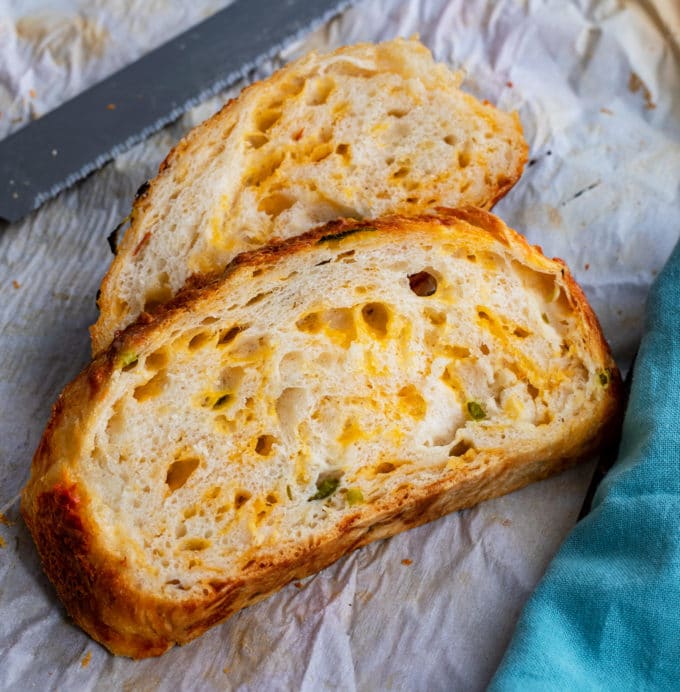
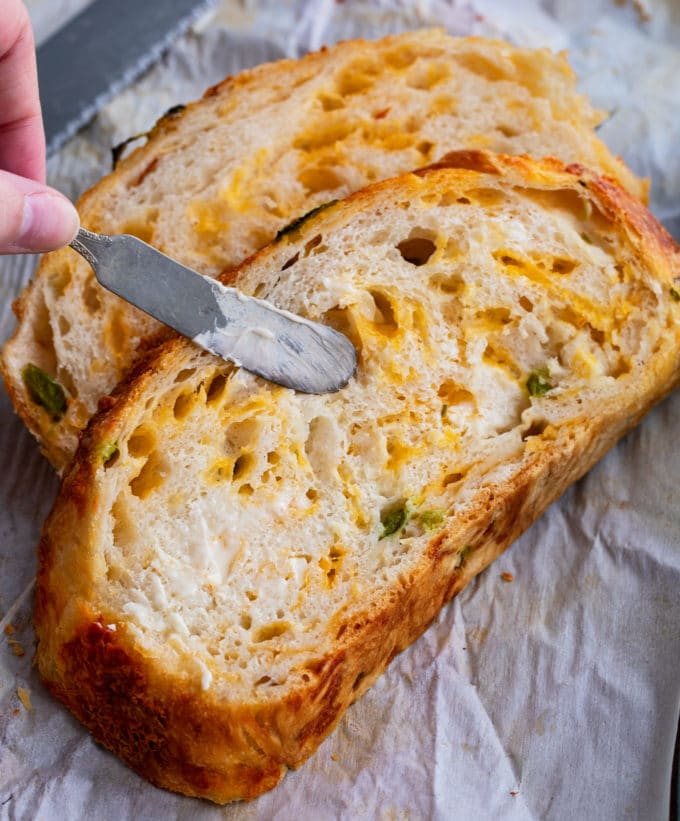
All the nooks and crannies are just BEGGING for some creamy salted butter. Although my favorite thing to make with this bread… is grilled cheese! Seriously, it’s amazing.
I have another suuuuuuper easy no-knead bread on my website, but it requires a really long rise/rest time… so you have to make it the night before you want to bake the bread.
It tastes amazing, but I wanted to tweak that recipe to see if I could make a no-knead dutch oven bread that DIDN’T require a rise overnight.
Like most breads, it does have to rise two different times, however, it’s virtually hands-off, since you just fold the dough with a rubber spatula in between the rises… you don’t even have to get your hands dirty!
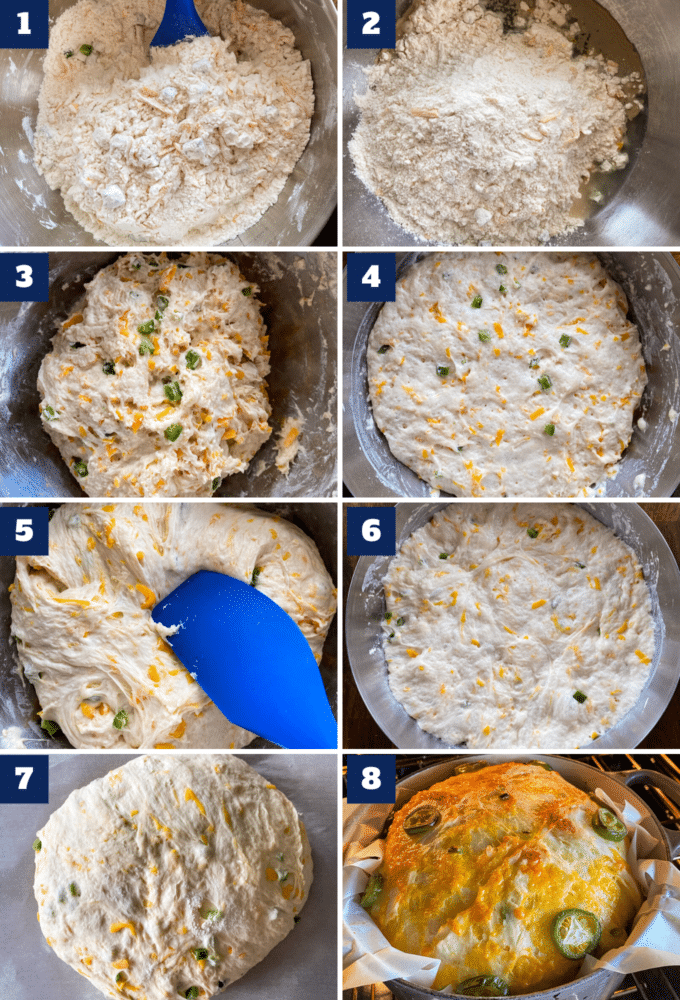
Let’s break it down… it may sound complicated, but I promise you it’s not, and I took step by step photos to show you.
HOW TO MAKE DUTCH OVEN BREAD
These steps correlate to the picture collage above!
- Add flour, salt, cheese and jalapenos to medium mixing bowl. Bread flour gives the best texture and rise for this bread, and I find shredding my own cheese helps it melt better.
- Add warm water and yeast to large mixing bowl – then add flour mixture. The water should be warm to the touch, but not hot. Like a baby’s bath water.
- Stir together and fold dough in on itself. Fold the dough from the outside of the bowl towards the center, turning the bowl a little each time, until you’ve folded the dough in on itself 8-10 times.
- Cover and let rise 1 hour. Picture 4 is what the dough will look like after this first rise.
- Fold dough in on itself again. Same method as before, although you’ll notice the dough looks and feels a bit more elastic, like in picture 5.
- Cover and let rise again for 1 hour. Picture 6 is what the dough will look like after this second rise. A little looser and more wobbly than the first time.
- Halfway through this rise time, preheat oven to 450°F with your dutch oven inside it. Let it preheat the full 30 minutes.
- Turn out dough and shape into a rough ball. Lightly flour your surface and your hands, then flip dough over and fold the corners of the dough in towards the center, about 6-8 times, until a rough ball is formed. Flip the dough over onto the piece of parchment paper.
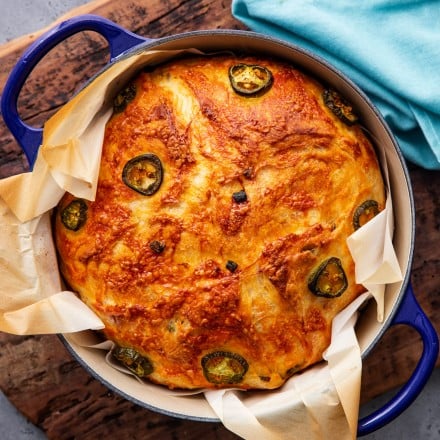
- Use a sharp knife to score the dough, spray with cooking spray (so the toppings stick), then add more shredded cheese and sliced jalapenos.
- Use parchment to transfer dough to dutch oven.
- Bake dough with the lid on for 30 minutes, then remove lid and bake 20 minutes. This creates a steamy environment for the bread to bake and rise, then when the lid is off, it let the bread brown and crisp nicely. Picture 8 is right when I removed the lid, after it had been baked 30 minutes.
- Remove bread from pot and parchment paper and let cool for 1-2 hours.
ADDITIONAL COOKING TIPS
- FLOUR – All purpose flour may be used instead of bread flour, but may result in a denser loaf.
- PEPPERS – Canned or jarred jalapenos may be used instead of fresh.
- YEAST – Active dry yeast may be used instead of instant, but when you add the yeast to the warm water, you want to stir to dissolve it and let it sit a few minutes before adding the flour mixture.
- POTS – Other sizes of dutch ovens can be used, although I wouldn’t go any smaller than 3.5 quarts, as this bread will be right up to the top of the dutch oven. Keep in mind, the wider the dutch oven, the wider and flatter your loaf of bread will be. It will spread out to be the size of the bottom of the pot.
VARIATIONS OF THIS RECIPE
- MILDER – for a jalapeno flavor, but very mild spice level, try using pickled jalapenos. The jar I buy from the store says “tamed” jalapenos.
- SPICIER – feel free to add additional jalapenos to this bread, or even mix in some serrano peppers.
- CHEESES – I opted for a classic sharp cheddar, but you can use any shreddable cheese you like. Colby, PepperJack, mild cheddar, etc.
- GARLIC – sometimes I like to add a teaspoon of garlic powder to this bread to give it a different flavor profile.
MAKING DUTCH OVEN BREAD AHEAD OF TIME
Freshly baked breads, like this one, taste best when they are fresh. While your bread will still taste good 1-2 days after it’s baked, it will always best the day of.
STORAGE
Bread should be kept at room temperature. Refrigerating bread actually causes it to go stale quicker (at least with homemade breads), so keep it out of there for best results.
I like to store my baked bread that hasn’t been sliced, just out on the counter.
Once it’s been cut, I like to add the bread, cut side down, to a paper bag.
FREEZING
Baked bread freezes very well! You can either freeze the entire loaf, or pre-slice the loaf and freeze it that way.
SPECIAL EQUIPMENT FOR THIS RECIPE
- Dutch Oven – this is the dutch oven I used, and LOVE, but it’s certainly pricey. I’ll link a more affordable one below. Bottom line is, this 3.5 quart size is the PERFECT size for a nice round loaf of bread.
- Affordable Dutch Oven – at more than 1/4th the price of the dutch oven linked above, this one is still a great quality pot, and it’s a 3.5 quart size.

BE SURE TO SCROLL DOWN TO CHECK OUT OTHER READERS’ COMMENTS FOR TIPS AND REVIEWS.
AND DON’T FORGET, IF YOU’VE MADE THIS RECIPE, LEAVE A COMMENT AND PLEASE GIVE IT A STAR RATING LETTING ME KNOW HOW YOU ENJOYED IT!
Did you make this? Be sure to leave a review below and tag me @the_chunky_chef on Facebook and Instagram!
Ingredients
TO A MEDIUM MIXING BOWL
- 3 1/2 cups bread flour
- 1 1/2 tsp kosher salt
- 2 cups shredded cheddar cheese
- 1 large jalapeno diced
TO A LARGE MIXING BOWL
- 2 cups warm water
- 2 1/4 tsp instant yeast (1 standard .25oz packet)
FOR THE TOPPING
- 1/3 - 1/2 cup shredded cheddar
- 10 round slices jalapeno (or more, to taste)
Instructions
- ** just a note; this is a high hydration dough, which means it's SUPPOSED to be looser and not nearly as "shape-able" as a traditional bread dough! There are step by step photos and a video in the post above this recipe card. **
- To a medium mixing bowl, add bread flour, salt, 2 cups cheddar cheese, and diced jalapenos. Stir and set aside.
- To a large mixing bowl (pretty large - your bread will be rising in this bowl), add the warm water and yeast. Water should be warm, but not hot (like a baby's bath water). Add flour mixture to the yeast and water, using a rubber spatula to stir it all together until no flour streaks remain.
- Use spatula to fold the dough from the outside of the bowl towards the center, turning the bowl a little each time, until you've folded the dough in on itself 8-10 times.
- Cover with a towel and let rise in a warm place for 1 hour.
- After 1 hour, use the rubber spatula to fold the dough in on itself again, 8-10 times. Cover with a towel and let rise in a warm place for 1 more hour.
- Halfway through this second rise, add your dutch oven, with the lid on, to your oven and preheat it to 450°F. Let it preheat for a full 30 minutes. Set out a piece of parchment paper large enough to go inside your dutch oven with a bit of overhang.
- Lightly dust a counter or cutting board with flour, and flour your hands as well. Turn out the dough onto the floured surface. Flip the dough over and brush off any excess flour.
- Fold the corners of the dough in towards the center, about 6-8 times, until a rough ball is formed. Flip the dough over onto the piece of parchment paper.
- Use a sharp knife to carefully score the dough (I like to make an "X"). Give the dough a quick spray with some cooking spray (or brush with oil), then sprinkle with set aside 1/3-1/2 cup of cheese and add sliced jalapenos.
- Use oven mitts to remove hot dutch oven from your oven and remove lid. Carefully use the parchment paper to transfer the dough to the dutch oven. Put the lid on, and return to the oven.
- Bake for 30 minutes with the lid on, then remove lid and continue baking another 20 minutes.
- After you've removed the dutch oven from the oven, tilt it slightly and use the parchment to sort of slide the bread and parchment out of the pot. It will come out easily.
- Remove parchment paper and let bread cool on a wire rack for 1-2 hours before slicing. Texture is best when bread is completely cooled before slicing.
Want to save this recipe for later? Click the heart in the bottom right corner to save to your own recipe box!
Chef Tips
** Just a note to avoid some confusion; this is a high hydration dough, which means it's SUPPOSED to be looser and not nearly as "shape-able" as a traditional bread dough! There are step by step photos and a video in the post above this recipe card. **
- All purpose flour may be used instead of bread flour, but may result in a denser loaf.
- Canned or jarred jalapenos may be used instead of fresh.
- Active dry yeast may be used instead of instant, but when you add the yeast to the warm water, you want to stir to dissolve it and let it sit a few minutes before adding the flour mixture.
- Other sizes of dutch ovens can be used, although I wouldn't go any smaller than 3.5 quarts, as this bread will be right up to the top of the dutch oven. Keep in mind, the wider the dutch oven, the wider and flatter your loaf of bread will be. It will spread out to be the size of the bottom of the pot.
- For a nice warm spot, run the microwave for about 30 seconds, then turn it off and add the bowl to the microwave. Preheating the oven for about 2 minutes then turning it off will work as well.
NO DUTCH OVEN?
- Boil about 1 1/2 cups of water.
- Add to a metal or ceramic pan (I like to use my 8x8 baking pan) on the bottom rack in the oven.
- Add parchment paper with shaped and topped dough to a baking sheet, and add to the middle oven rack.
- Bake for 45-50 minutes, checking for doneness.
Video
Nutrition Disclaimer
The Chunky Chef is not a dietician or nutritionist, and any nutritional information shared is an estimate. If calorie count and other nutritional values are important to you, we recommend running the ingredients through whichever online nutritional calculator you prefer. Calories can vary quite a bit depending on which brands were used.
Recipe tweaked from my own recipe and Tasty’s.
Donna says
This is so easy and taste great. I’ve made this multiple times for my family. They just can’t get enough. Thanks
Rebecca Holland says
This bread is so simple and turns out perfectly every time. I ran out of time last night, so I refrigerated the dough after the second rise. It still turned out perfectly when I baked it as directed today. Thanks for such an awesome recipe! It is a favorite around here.
Liz says
I have tried several different Dutch oven bread recipes. This is by far the best. Adding the cheese and jalapeños into the dough at the beginning makes it much easier. And this dough was easier to form into a ball. The texture was amazing. Thanks for your clear instructions. I highly recommend that you try this recipe !
Lindsey says
Girl. GIRLLLLL. You are baking royalty as far as I’m concerned, because holy what this is an AMAZING bread. I made it, it was only the fourth time I’ve ever even worked with yeast and it was exactly like your photos. Gorgeous. Better than anything in the bakery of my grocer’s. And I had it yesterday with white chicken chili and am having it today for lunch as a grilled cheese. I could eat this daily for the rest of my life. I won’t but I COULD. Bless you. All the carb trophies! 🏆
The Chunky Chef says
You win the best comment award! Lol, but seriously, thank you so much for your super kind words! I’m so happy to hear how much you love this bread 🙂
Fawn says
This bread is absolutely amazing. I have made this bread often as it is a family favorite. To those that are leary of trying it out….DO SO! You will not be disappointed!
Question-have you ever cooked 2 loaves at the same time? If so does the cook time change?
The Chunky Chef says
So happy to hear how much you all are enjoying this recipe! I haven’t tested baking two loaves together, so I can’t say for certain if any baking changes would need to be made. I would guess that it might take a bit longer, so I would just add an extra few minutes onto both the covered and uncovered baking times (checking to make sure the top doesn’t burn), and go from there 🙂
Pam Beller says
The bread always feels a bit raw and dense after cooking. I’ve tried extending the baking time but wondering if a little more flour might help. It’s very wet and difficult to get in the Dutch oven. Thoughts?
The Chunky Chef says
You could try adding a bit of extra flour, although this dough is supposed to be very wet, as mentioned in the recipe card. If you check out the step by step photos and videos you can see the texture. Are you sure your oven temperature is correct? I only ask because years ago ours was off, by over 50 degrees! Naturally that was making things not turn out as they should, being cooked at a temperature 50 degrees lower than indicated.
Jean says
I used my Staub 3.5 qt Dutch Oven and added about 10 minutes baking time after removing the lid. (I did use all-purpose flour)
This bread was so amazing I immediately shared it with my friends.
This recipe will be on repeat.
Can’t wait to pop some slices into the toaster tomorrow!
Donna Shrader says
Hi! Can u bake this in a loaf pan?
The Chunky Chef says
While I’m sure you could divide the dough into several loaf pans, I haven’t tested the recipe that way, so I can’t speak to what other changes would need to be made or what the new baking time would be.
Shannon Chase says
Hi! I’ve made this bread a few times and am still having trouble with it coming out under baked even when I check the temp (checking for 210F). Unfortunately, my oven seems to only reach 425F, which is the main problem, but I figured checking the temp would help me judge doneness, but it doesn’t. Do you have a recommended temp to check doneness or a time to bake at 425F?
The Chunky Chef says
Since I haven’t tested it, I can’t say for certain about the internal temperature (I just tap the bottom and listen for it to sound hollow), but you’ll definitely need more time at 425°F, maybe try baking for 35 minutes with the lid on and 25-30 minutes with the lid off.
Jennifer says
Thank you for sharing such a great recipe. It turned out perfect thanks to your simple, clear instructions. : )
Cat says
OMG this is SO GOOD! I only wish I had a slightly smaller dutch oven. My “universal” 6 quart size makes a relatively flatter loaf. I imagine a 4 qt dutch oven would result in a perfect round boule.
Kdeb says
Absolutely perfect! I’ve made this just as she said MANY times and each one turns out beautiful! Thank you so much!
Anita Furlan says
Have made this multiple times and turns out exactly as described. Beautiful crisp crust and soft middle. Thank you!
Alta says
Can I cut the dough in half and make 2 smaller loaves? Do I change the bake time?
The Chunky Chef says
I haven’t tested that, so I can’t say what the new bake time would be. If you experiment, I’d love to know how it goes!
Rebecca says
Very delicious! Turned out perfectly and so easy to make.
Pam says
Wonderful bread recipe. Perfect every time.
One question ……. If I don’t want to bake immediately after the last rise, can I wait a few hours? Just let it continue to rise?
The Chunky Chef says
Glad you enjoy it! I honestly couldn’t say, as I haven’t tested altering the recipe that way. If you experiment, I’d love to know how it goes!
Priyam says
I’ve made this recipe at least 10 times over the past few years, and it’s always a huge hit. This has become the standard my kids compare any other jalapeño bread to, and they always say their mom’s version is better. All thanks to you!”
Maddy H says
I tripled the amount of jalapeño for personal preference, plus I used your instructions for baking without a Dutch oven and it turned out wonderful! My husband and I couldn’t even wait for it to cool down before eating, the house smelled so good. This is gonna become my go-to recipe. So soo soft and moist, I keep going back for more!
Tami says
Super easy. Unfortunately, my loaf sunk in the middle when cooling. Thinking it maybe needed to bake longer because I followed recipe to a T and it rose beautifully both times. I haven’t cut into it yet…but I will be honest, as long as it’s not raw I’m eating it because the smell has been driving me crazy for hours now 🤣. Will definitely try again and bake a bit longer than recipe says. I think my oven is just a slow burn or something lol. Planning on using it for BLTs tonight.
Regardless, great recipe! Looking forward to making it again and trying other no knead breads since this was my first one.
Kyle Fulkerson says
Do you have a recommendation on how to scale the ingredients to use a 5.5qt rather than a 3.5qt Dutch oven?
The Chunky Chef says
Unfortunately I don’t, as I’ve only made/tested this recipe as written. If you do some experimenting, I’d love to know how it goes 🙂