Pizza Pizza!!! Okay, I have a love affair with pizza… for real… I could eat pizza every single day and be completely happy lol. Until the other day, the only pizza I’d made at home was one with a can of refrigerated pizza dough. Now those have their time and place… but to me, there’s always a distinct taste to those dough’s… not quite pizza place quality. That always bothered me, but I was too afraid of using yeast to make my own pizza dough. Well I found the perfect one… and guess what? It requires no kneading… that’s right… NO kneading! And no mixer, no pizza peel, no pizza stone… it sounds too good to be true doesn’t it?
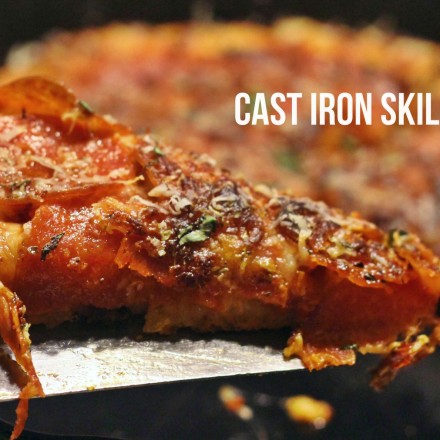
It’s not too good to be true, it’s just the perfect pizza dough 😀 Remember those Pizza Hut Pan pizzas? That crispy edge of the crust where the cheese fell between the crust and the side of the pan… the golden brown and crispy bottom, chewy center… thick slices of heaven piled high with layers of sauce, pepperoni and cheese. *drool* Well now, you can have that at home, anytime you want… no waiting for a delivery driver, no tip required!
My recipe uses a cast iron skillet (man I love my cast iron pans), but you could make these in a round cake pan as well 🙂
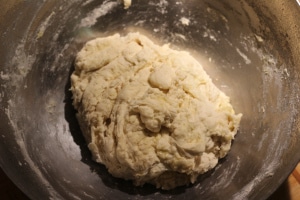
I’ve heard of “no knead” breads before (will be trying that soon!), however I didn’t realize you could have a “no knead” pizza dough. You literally mix up the dough, place it in a big bowl, and let it sit… for a while. Anywhere from 8-24 hours will do the trick… you have to let it do it’s thing. I let mine rest for about 20 hours or so. Once the kids had gone to bed the night before I wanted to make the pizza, I mixed up the dough in about 2 minutes with a wooden spoon, covered the bowl with plastic wrap, and let it sit on my counter until 4pm the next day. Easiest. Dough. Ever!


Then about 2 hours before I wanted to bake my pizza, I floured the top of my dough and turned it out onto my floured cutting board. I divided it in 2 pieces, formed them into disk shapes, placed one in a ziploc bag for the freezer (that’s right this recipe gives you enough dough for 2 pizzas!!), placed the other disk into an oiled cast iron skillet (just drizzle some olive oil in the skillet first, then add the dough). I used my fingers to mush it around a little, slightly spreading it out… covered the skillet with plastic wrap, and let it sit for 2 hours.


Once the dough has rested, you’ll see that it has spread out slightly, filling the pan. Use your fingers to press into the dough, working out any large air bubbles. Carefully lift up the edges of the dough, then lay it back down. This will help to eliminate air bubbles on the bottom of the dough. Now comes the really fun part!
You get to build your ultimate pizza 😀 Spread your sauce on your dough… you can make your own, but I found a brand that I love, so I used Classico’s pizza sauce (I just added 1 minced garlic clove, and a pinch of italian seasoning)… it’s my go to for pizza sauce. Now cheese it up, I used a shredded mozzarella. I chose to go for the classic pepperoni pizza, but you can add any toppings you want 🙂 I layered on my pepperoni, sprinkled on some shredded italian 5 cheese, a pinch of pizza seasoning and a drizzle of olive oil.


You want to really crank up the oven temp for this pizza… up to 550 if you oven goes that high. If not, just set it as high as it will go. Let your oven preheat, then slide your skillet into the oven and bake for 12-15 minutes. If the bottom of your crust isn’t as crispy as you want it once it’s done baking, just place your skillet on the burner for a couple minutes over medium heat…. problem solved!
Just as a side note… I hate taking pictures under the kitchen lights… not very appetizing at all!! But alas, that’s what I had to work with… so here’s the finished product.
These pictures don’t even come CLOSE to representing how amazing this pizza was… you just have to try it!

I really hope you all try this… I’m sure I managed to make it sound way more complicated than it actually is lol… you won’t be disappointed! This is absolutely my “go-to” pizza from now on 😀
Recipe adapted from Serious Eats
Did you make this? Be sure to leave a review below and tag me @the_chunky_chef on Facebook and Instagram!
Ingredients
- 2 1/2 cups bread flour
- 1/2 tsp dry active yeast
- 2 tsp salt
- 1 cup + 3 Tbsp warm water
- 2 tsp olive oil plus more to coat pan
- Pizza sauce
- Cheese
- Toppings
- Fresh basil minced (optional garnish)
Instructions
- Combine flour, yeast, salt, oil, and warm water in a large bowl. Using a wooden spoon, mix until no dry flour remains. Make sure the bowl is nice and large to accommodate for rising.
- Cover bowl tightly with plastic wrap and let sit on a counter for 8-24 hours. Dough will rise quite a bit.
- Once fully rested, sprinkle top of dough with flour and turn out onto a well floured surface.
- Divide dough into 2 portions, shape each into a ball/disk... tucking dough under itself to form a tight ball.
- If desired, place one of the balls in a ziploc bag for freezing.
- Pour some oil (a couple tablespoons) in the bottom of the cast iron pan, place ball of dough in pan, turning to coat in the oil.
- Using your hand, push the dough around to spread the oil in the pan.
- Cover tightly with plastic wrap and let rest for 2 hours.
- Preheat oven to 550 degrees (or as high as your oven goes)
- Once dough has rested, it should have settled and puffed to fill the pan. Use your fingers to push the dough into all edges of the pan and remove large air bubbles.
- Lift up edges of the dough to eliminate any air pockets on the bottom of the dough.
- Top the dough with your pizza sauce, cheese and any desired toppings or seasonings. Drizzle with olive oil.
- Place skillet in oven and bake for 12-15 minutes. The top should be bubbly and golden brown.
- Use a spatula to lift the edge of the pizza and check to see if the bottom is nice and golden brown and crisp. If you'd like it crispier, place on a stovetop burner over medium heat for a couple of minutes.
- Sprinkle pizza with grated parmesan cheese and/or fresh basil. Slice into pieces and serve hot.
Want to save this recipe for later? Click the heart in the bottom right corner to save to your own recipe box!
Nutrition Disclaimer
The Chunky Chef is not a dietician or nutritionist, and any nutritional information shared is an estimate. If calorie count and other nutritional values are important to you, we recommend running the ingredients through whichever online nutritional calculator you prefer. Calories can vary quite a bit depending on which brands were used.


Pat says
Love, love, love deep dish pizza. This is the best way to make pizza at home.
Dana says
Oh my gosh what a pizza! Made this tonight and it was a huge hit here in GA 🙂 I didnt feel bloated afterwards like take out or frozen pizza. I will def. make this again and again. Thanks Amanda!
Maria Barbieri says
Absolutely deeeelicious!!!!! And now we’re 2 for 2! I stumbled upon your site when searching for an easy shepherd’s pie recipe, which has become a hands down favorite with my young adults, and now, once again, I turn my back to find barely a crumb in my skillet 😋 Super excited to try more of your recipes and a gluten free version of the cast iron skillet pizza! Let’s get cookin’ is right!!!
Will says
That looks spectacular. My trouble is I’m so bad at planning ahead. I’ll have to make a point of doing this though! If you are looking for some ideas, I’d love to see a Chicago style deep dish pizza I can cook at home. Thanks!
Stephanie says
DAH! I can nooottttt wait to make this!!!!!
The Chunky Chef says
Ooooooh you’ll LOVE it! I need to make it for lunch one day so I can actually take pics in good lighting 😉
Jessy @ The Life Jolie says
I clearly do not use my cast iron skillet enough- great idea and looks delish!
Nancy says
That looks like pizza perfection to me! Delicious. 🙂
MyAdventuresInDinnerTime says
Thank you!! It was ah-mazing 😀
ohiocook says
Very good, and using my favorite the cast iron skillet. I’ll have to try this one, good job!
MyAdventuresInDinnerTime says
Thank you!!! I’m a total cast iron convert, and pizza is always welcome. I hope you love it 🙂