


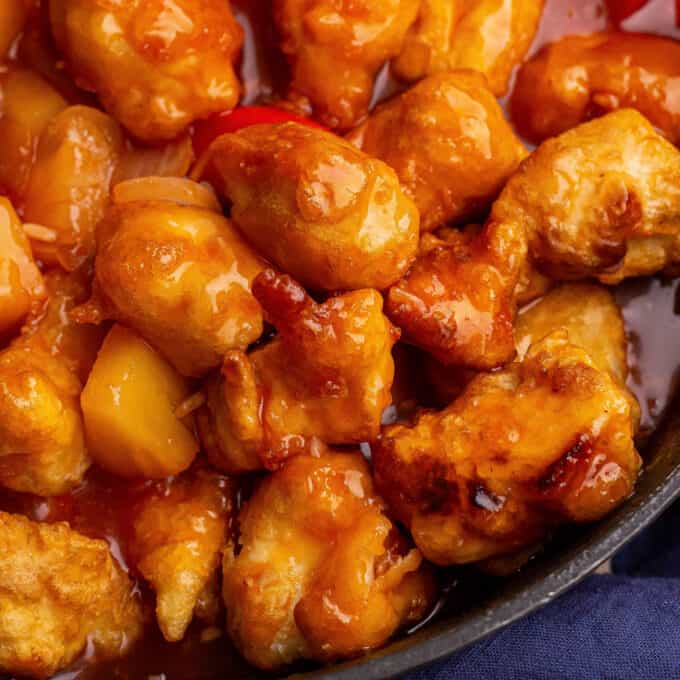
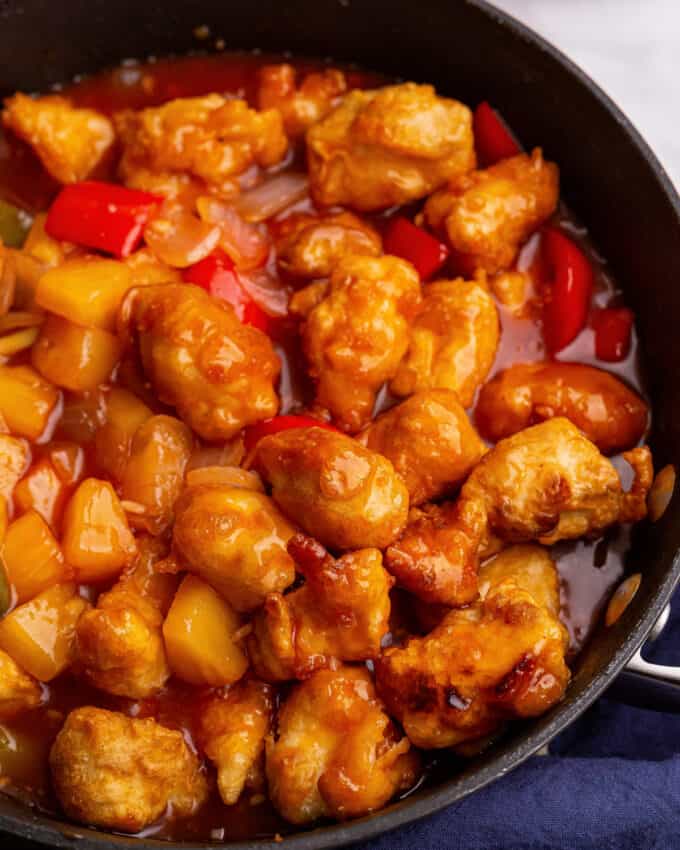
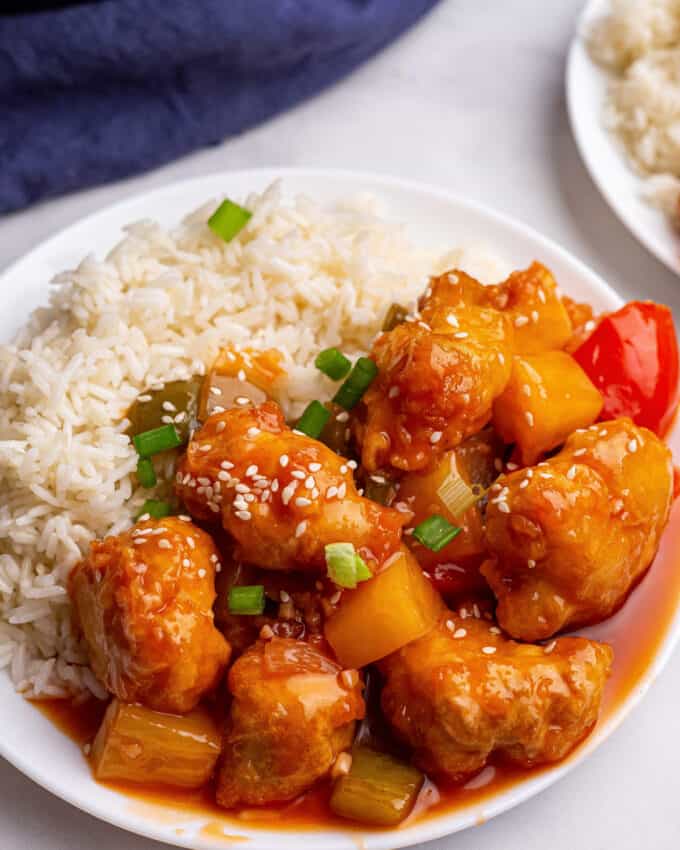
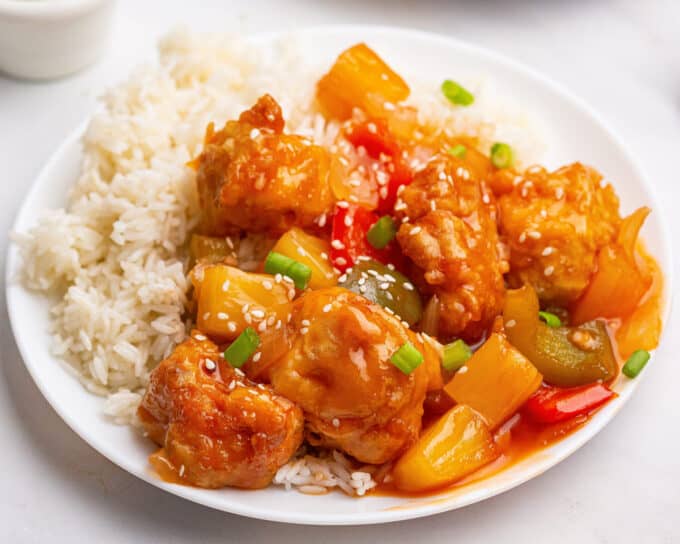
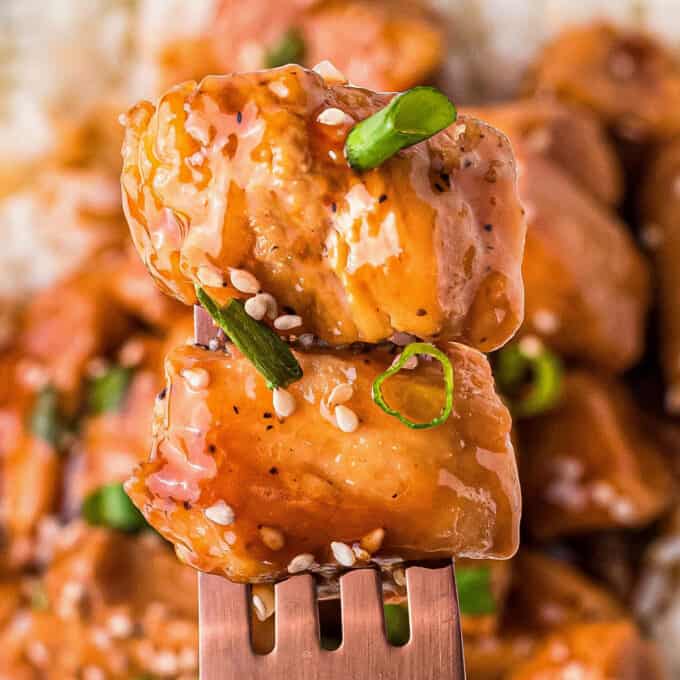
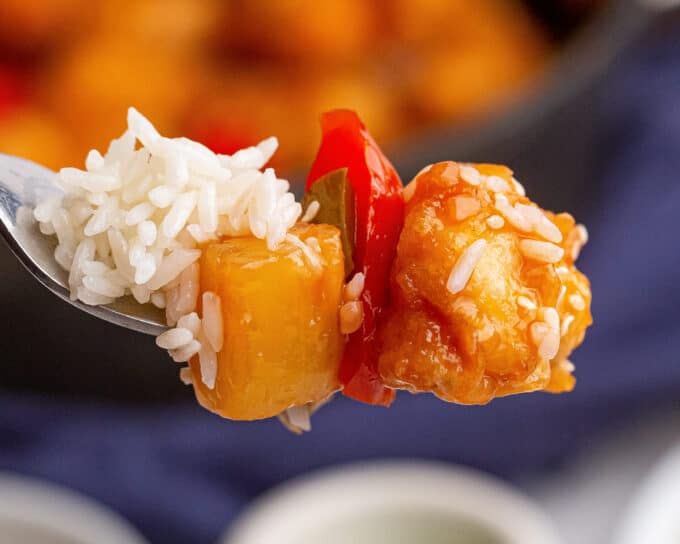
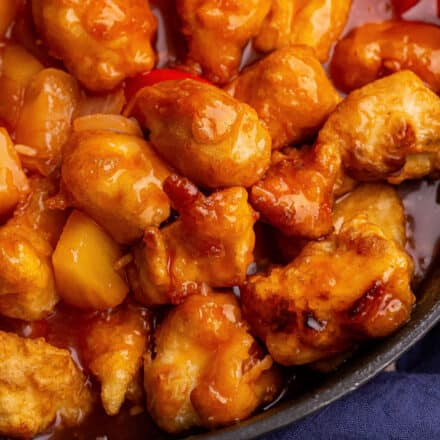
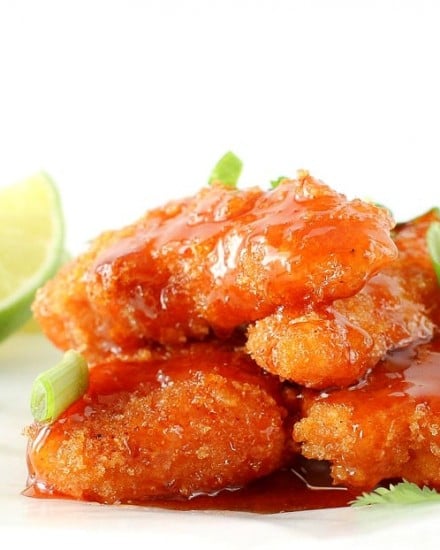
This Sweet and Sour Chicken Skillet is the perfect family dinner! Chicken is fried until crispy, added to a skillet with sautéed bell peppers, onions and pineapple, and tossed in an amazing takeout style sweet and sour sauce!
This is one of my Asian-inspired recipes I know you’ll want to keep on hand!
I shared yesterday how obsessed my kids are with sweet and sour chicken… and here’s our favorite recipe of all time!
Granted, sometimes they don’t dig the onions and peppers, but us adults do, so more for us right?
What I love most about this recipe is that it can be made all in one skillet, leaving you with way less dishes to worry about after dinner. All you need is a deeper skillet, otherwise the frying process can get a bit messy.
This recipe uses that exact sauce I shared yesterday, just cooked in a slightly different way, so it cooks down with the chicken and veggies, leaving them gloriously coated with that sweet and tangy sauce.
Let’s see how to make it!
How to make a sweet and sour chicken skillet?
This is just an overview; the full ingredients and directions are in the recipe card toward the bottom of this post.
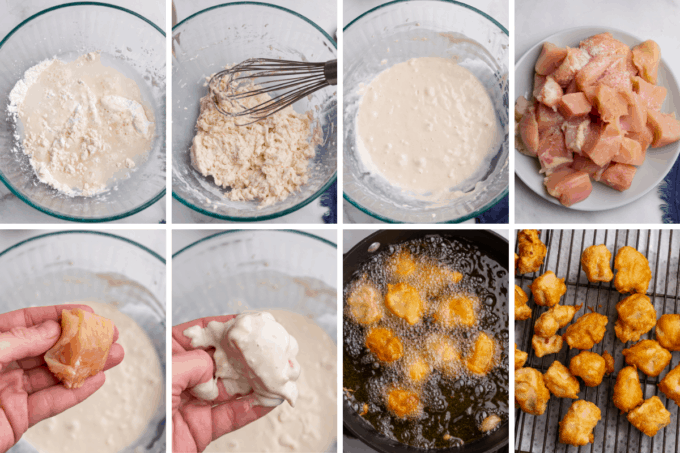
- Prep frying area and preheat oil.
- Combine batter. Whisk together and set near the stove, so you won’t have a long distance to carry the battered chicken.
- Season chicken. I kept it simple and just used salt.
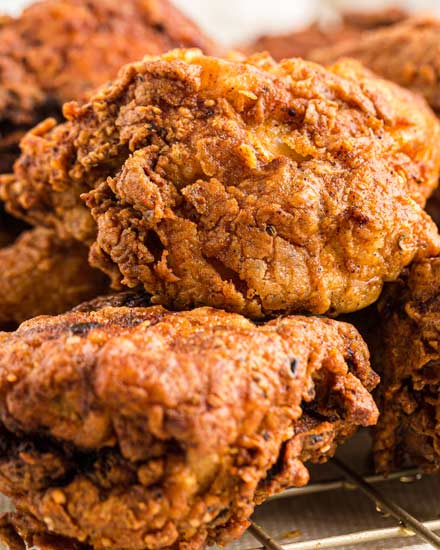
- Batter chicken. Do this one piece at a time, then carefully add to hot oil.
- Fry. For 2-3 minutes, or until cooked through.
- Let cool. Transfer chicken to wire cooling rack. This keeps the chicken crispy.
- Drain out frying oil.
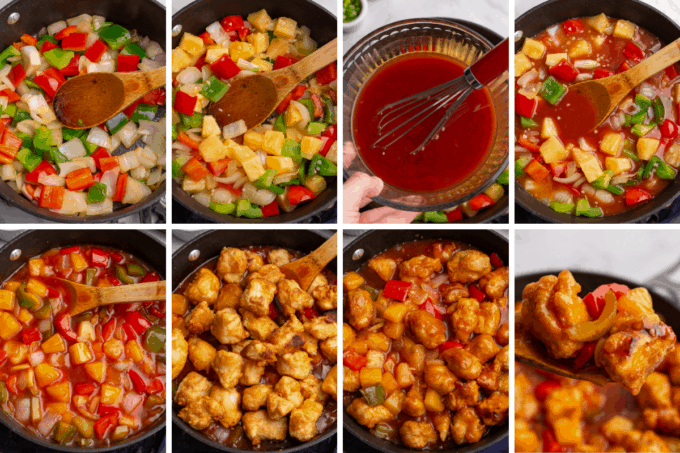
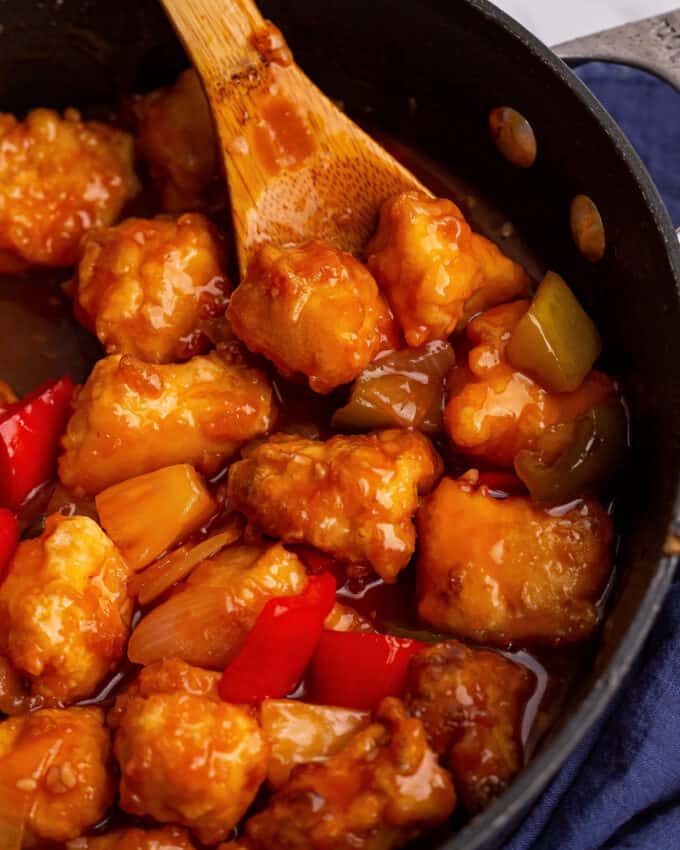
- Saute veggies. Just a couple minutes, until crisp tender. Add garlic and cook a minute more.
- Add sauce. Stir well.
- Simmer. Cook until sauce is simmering and thickening, just a few minutes.
- Add chicken. Add in fried chicken and stir well.
- Serve. Serve immediately.
Helpful Tip!
Frying can be intimidating, but don’t panic. You can do this, and you don’t need a bunch of expensive equipment. I’ve included a frying tips section right above the written recipe, that will turn you into a frying master in no time!
Variations of this recipe
- Chicken – if you like chicken thighs, you can swap out the chicken breasts for chicken thighs.
- Other protein – in fact, this recipe works great with pork (we like to use pork chops), and shrimp too!
- Peppers – I like the combination of bitter and sweet peppers, which is why I included both a green and red bell pepper in this recipe. But feel free to change the peppers to what you like.
- Pineapple – we like to use frozen pineapple tidbits, but canned or fresh will work as well.
- Non-fried – if you’d prefer to save a few calories, you don’t have to fry the chicken. You can just saute it in the skillet until cooked through.
FAQ’s
No, this is a recipe for the American Chinese takeout-style sweet and sour chicken.
Yes! If you want the family-style version of this recipe, you can simply fry the chicken as directed, and serve it alongside the sauce. No need for the onion, peppers, or pineapple. Just dip the chicken into the sauce and dive in!
Our favorites are some cooked white rice (or the coconut rice from this recipe), and roasted or steamed broccoli. And of course, some crispy crab rangoons for a fun treat!
Making sweet and sour chicken ahead of time
I don’t recommend making this recipe ahead of time, since the chicken won’t stay crispy if you make it in advance.
However, you can absolutely prep things ahead! This cuts the total time way down.
- The onion, bell peppers, and garlic can be chopped. Just keep them in an airtight container in the refrigerator until ready to cook.
- The pineapple can be drained. Just keep it in an airtight container in the refrigerator until ready to cook.
- The sauce can be whisked. All except the cornstarch and water, that should be added when cooking. Keep the sauce refrigerated in an airtight container until ready to cook.
- The chicken can be sliced. Just keep it in an airtight container in the refrigerator until ready to cook.
Storage
Leftover sweet and sour chicken should be stored in an airtight container in the refrigerator and eaten within 3-4 days.
To reheat so the chicken stays crispy, I like to separate the chicken from the sauce, and pat it dry with paper towels.
You can either reheat the chicken in the air fryer (at 390°F for 2-3 minutes), or in the oven (at 350°F for 10-15 minutes), and reheat the rest of the sauce and veggies separately.
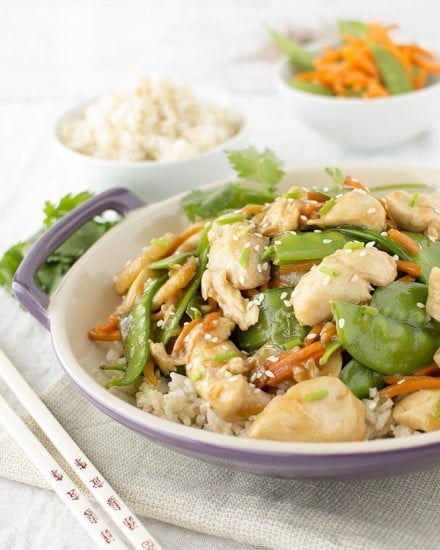
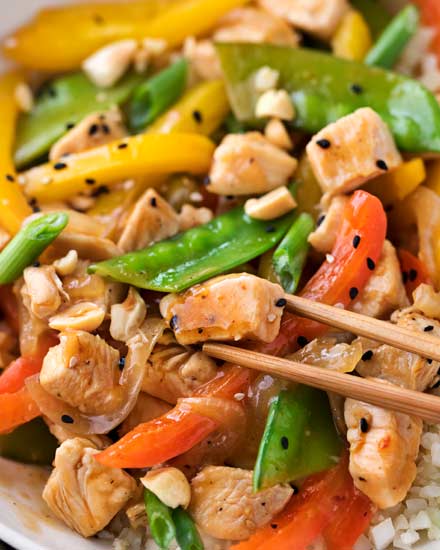
Other Asian-Inspired Recipes:

Handy Frying Tips!
- Pat the meat very dry before adding it to the batter. The wet batter will slide right off a wet piece of chicken.
- Use a thermometer to ensure the oil is the right temperature. Guessing just isn’t the way to go here. If the oil is too hot, the chicken will burn before they’re cooked through. If the oil is too low, the chicken will take on too much oil and be oily and soggy. Around 350°F is the sweet spot.
- Drop the breaded food away from you when you add them to the oil. Hot oil is not fun to get on your bare skin – trust me!
- Don’t overcrowd the pot/pan. Every time you add anything to hot oil, it lowers the temperature a bit. So adding all your chicken at once will drop the temperature too much, which leads to unevenly cooked, oily and soggy chicken. I like to add about 10 pieces of chicken at a time, when using a large pot.
- Use a frying spider instead of tongs to handle fried food in the oil. Tongs have a tendency to rip off pieces of that delicious batter. Spiders are inexpensive and great for so many things.
- Drain the fried food of excess oil after frying by adding it to a wire cooling rack. This elevates the food and keeps the coating crisp.

My Favorite Thermometer!
The easiest way to fry, is to know what temperature your oil is… and a thermometer is the tool for that. This version clips right on the side of you pot, so you can have perfect frying results, every time!
Did you make this? Be sure to leave a review below and tag me @the_chunky_chef on Facebook and Instagram!
Ingredients
Chicken
- 2 average sized boneless skinless chicken breasts cut into small bite-sized pieces
- 1/2 tsp kosher salt
- 1/2 cup all purpose flour
- 1/4 cup cornstarch
- 1 tsp baking powder
- 1/2 tsp baking soda
- 3/4 cup cold water
- enough vegetable oil to fill a deep skillet by about 1.5 inches
Sauce
- 1 cup canned pineapple juice
- 2/3 cup packed light brown sugar
- 1/3 cup rice vinegar
- 1/4 cup ketchup
- 2 Tbsp reduced sodium soy sauce
- 2 Tbsp cold water
- 1 1/2 Tbsp cornstarch
- 1 – 2 drops red food coloring (optional)
Skillet
- 1 medium yellow onion peeled and sliced into roughly 1 inch pieces
- 1 red bell pepper seeded and sliced into roughly 1 inch pieces
- 1 green bell pepper seeded and sliced into roughly 1 inch pieces
- 3 cloves garlic minced
- 8 oz can pineapple tidbits drained
- sesame seeds for garnish
- sliced green onions for garnish
Instructions
- In a large deep skillet, heat oil over MED heat until it reaches approximately 350°F. Line a baking sheet with a paper towel, then top with a cooling rack. Set nearby, as this is where the chicken will rest once fried.
- In a mixing bowl, combine flour, cornstarch, baking powder, baking soda and cold water and whisk until smooth. Set near your stove.
- Season chicken pieces with salt and place near the mixing bowl.
- Whisk sauce ingredients together in a small mixing bowl and set aside.
- When oil is ready, dip chicken pieces, one a time, into batter and then carefully add them to the hot oil. Add about 10 pieces to the oil at a time.
- Let fry for 2-3 minutes, or until golden brown. Remove with a metal spider or slotted spoon, and place on prepared baking sheet/cooling rack. Repeat with remaining chicken.
- Drain out all but about 1-2 Tbsp of the oil and keep heat over MED HIGH. Add onion and bell peppers to the skillet and cook for about 2 minutes, until crisp tender.
- Add garlic and pineapple and cook about 1 minute.
- Pour sauce into skillet, stirring well to coat. Cook until sauce is bubbling and thickening, then add in fried chicken pieces and stir well.
- Serve immediately, garnished with sesame seeds and sliced green onions if desired. We like to serve white rice alongside.
Want to save this recipe for later? Click the heart in the bottom right corner to save to your own recipe box!
Chef Tips
- Recipe times do not include the time needed for the oil to come up to temperature, since that will vary from individual to individual.
- Calorie count does not include the oil, as the amount needed will vary from individual to individual.
Nutrition Disclaimer
The Chunky Chef is not a dietician or nutritionist, and any nutritional information shared is an estimate. If calorie count and other nutritional values are important to you, we recommend running the ingredients through whichever online nutritional calculator you prefer. Calories can vary quite a bit depending on which brands were used.
Viv says
the best ever!! outstanding!! tx you did with broccoli ❤️
Ben says
This was heaven in my mouth. If you don’t cook this, you are missing out. And if you don’t like it, you made it wrong. 😉
Lauren says
We eat this at least once a week. It’s better then any take out place and worth all the work!
Maureen says
Thanks for this amazing recipe! I have tried other sweet and sour recipes but yours is the best so far!
Gary D says
If I could, I would give it 20+ stars. It turned out far Better than I expected 😜👍🏼
This is Definitely an all time favorite 👍🏼👍🏼
I totally agree with you. This recipe is Amazing 😍
Maureen McCarthy says
This was really good but lots of leftovers. Can you freeze?
The Chunky Chef says
So glad you enjoyed it! I haven’t tested freezing this recipe, so I can’t say for certain how well it’ll work. If you do some experimenting, I’d love to know how it turns out 🙂
paula smith says
excellent!!!!
Lisa Bell says
This was delicious, as are all of your recipes that I have tried. My chicken breading ended up a little soggy. What did I do wrong?
The Chunky Chef says
I’m glad you loved the taste! Was the breading soggy right after frying? Or once it was in the sauce?
Nicolette says
Hey, I made this for dinner tonight and my family really enjoyed it. Thanks!
Angelina says
This recipe is really very good, the chicken is very tasty, this sweet and sour sauce is perfect for chicken. I’m making this chicken again this weekend!
Gary says
This is my first time making this myself. And it did Not disappoint..
I even added some Garlic powder to the batter. And it really Increased the flavor 😁
Allyson Zea says
Oh my goodness this is sooooo perfect for dinner!!!!
Tisha says
Sweet and sour chicken is my favorite from Chinese restaurants I’m going to make this for myself
Krystle says
This turned out so good, healthier and tastier than takeout!
Sandra says
This is really good! My kids loved it too! A new favorite meal at my house!
Beti | easyweeknightrecipes says
Such a fantastic meal! I love the flavors!! My family would really enjoy this!
katerina @ diethood.com says
This looks incredibly delicious!! I can’t wait to try it!
Erin | Dinners, Dishes and Dessert says
This Sweet and Sour Chicken Skillet couldn’t look any more perfect!
Beth says
Oh, yes. I love takeout, and the idea of making it myself is so much fun! I can’t wait to try this.
Rebecca Andrews says
I actually made this tonite before I came across your recipe in today’s mail! I just winged it, with the veggies, rolled chicken in cornstarch and fried it in hot oil! I made the sauce that you put out yesterday. Put it all together and it was really good. The sauce is wonderful! I had too many dirty dishes, when I finished. I see that you eliminated that so will go with your recipe next time! Great recipe and thanks for sharing!