


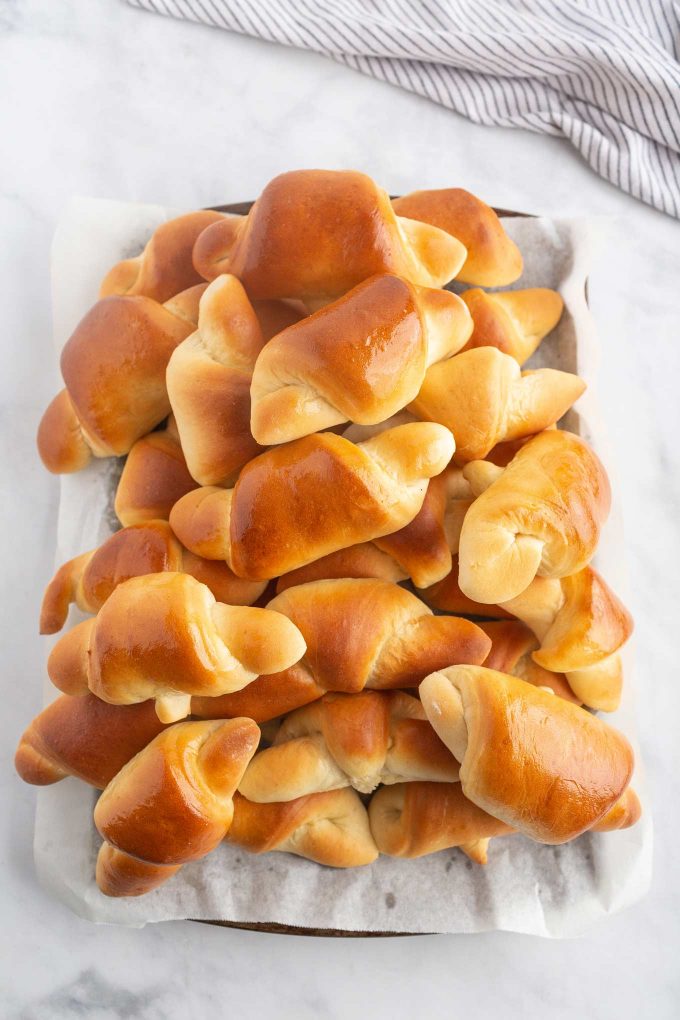
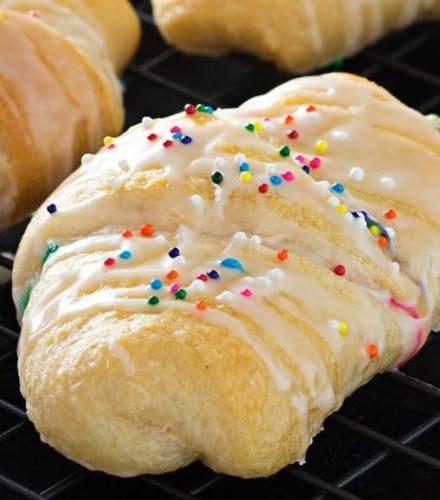
Buttery, soft and flaky, these Homemade Crescent Rolls are easier to make than you think! Perfect rolls for Thanksgiving or a family dinner!
This Rosemary Focaccia Recipe is one of those recipes that is easy to make, yet LOOKS complicated. We also love easy bread recipes like my Honey Butter Dinner Rolls and Rosemary Focaccia. This is one of my Bread Recipes I know you’ll want to keep on hand!
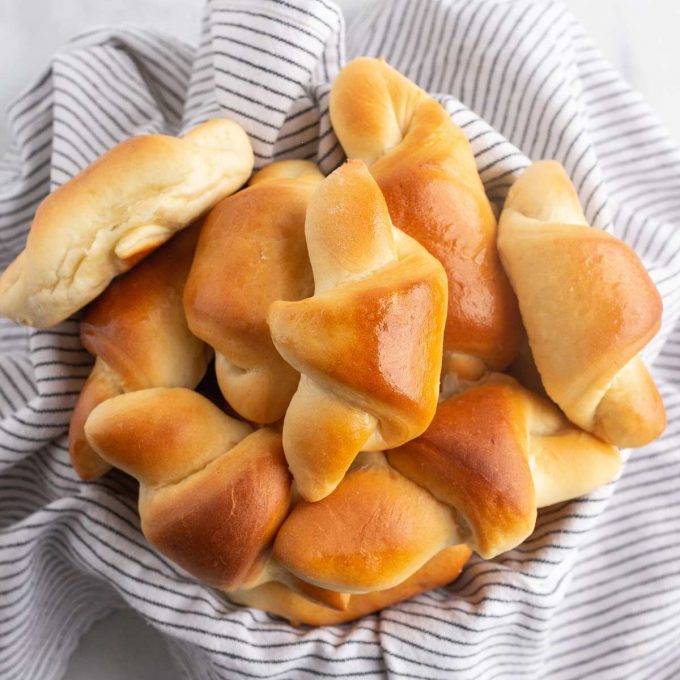
CRESCENT ROLLS RECIPE
Ever since I shared my Ultimate Dinner Rolls in 2018, I’ve gotten countless requests for more bread recipes. Especially this time of year, when baking is ramping up!
I apologize in advance, this is going to be a pretty photo heavy post. Even though these crescent rolls aren’t incredibly complicated, there are quite a few steps, and I want to be sure to show you everything, step by step.
Thankfully, you don’t have to spend allllll day making these rolls, since you can make the dough ahead of time, and do all the rolling, shaping, second rise and baking the next day.
HOW TO MAKE HOMEMADE CRESCENT ROLLS
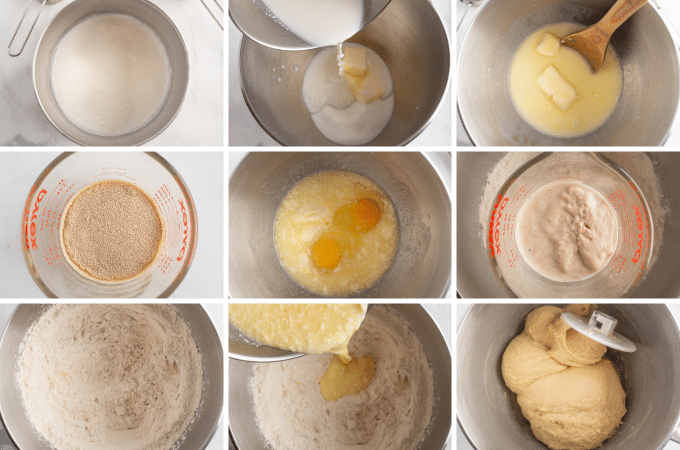
- Scald milk. Scalding the milk is as simple as heating the milk until it has a skin on it and bubbles are forming around the edges. This helps give your rolls the best texture! I take my milk off the heat once it reaches 170°F degrees.
- Combine butter, sugar, salt. In a medium mixing bowl, combine those three ingredients. Add scalded milk and stir. Let sit until mixture is 110°F or warm to the touch but not hot.
- Combine yeast and water. While the milk mixture is cooling, combine the yeast and water in a small bowl and let it sit about 5 minutes, until frothy.
- Add eggs. Once the milk mixture has reached 110°F, add the eggs and whisk.
- Add flour to stand mixer bowl. Fit your mixer with the dough hook attachment and add flour. Stir in frothy yeast and water mixture.
- Add in milk mixture. Pour in scalded milk mixture and mix on LOW until combined.
- Knead dough. Increase mixer speed to MED and knead dough until it’s smooth and elastic. This should take between 6-12 minutes.
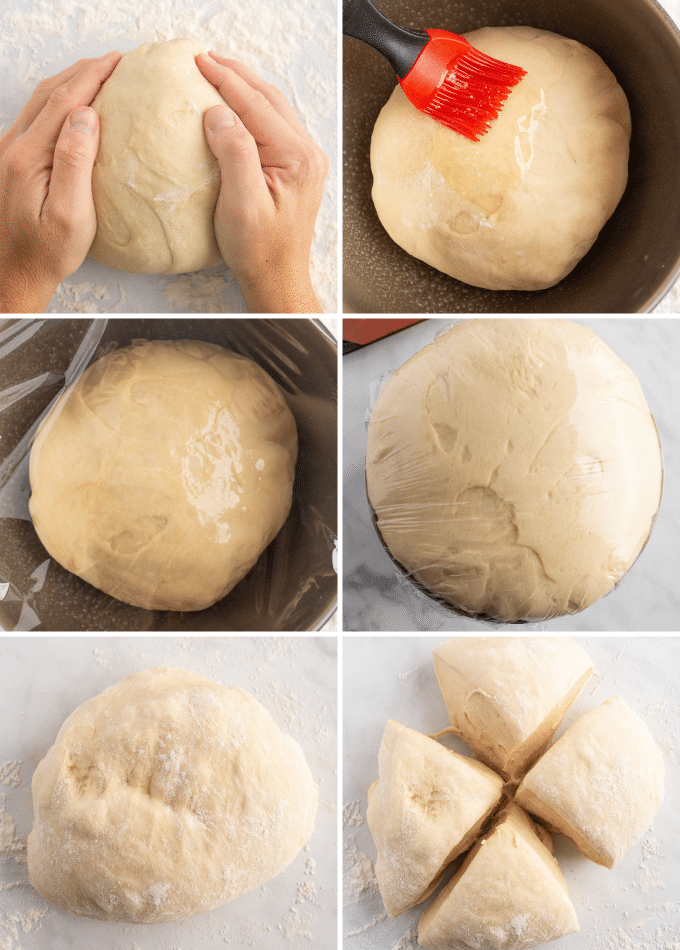
- Turn out dough and shape. Roughly shape dough into a ball… it doesn’t have to be perfect.
- Transfer to bowl. Lightly grease a large mixing bowl with cooking spray and add dough ball to it.
- Brush with butter and cover. Brush top of the dough ball with melted butter and cover with plastic wrap.
- Let rise. Place the bowl in a warm place and let rise for 2 hours, or until doubled in size.
- Turn out dough and divide. Turn out dough onto a lightly floured surface (counters work great) and cut into 4 equally sized portions.
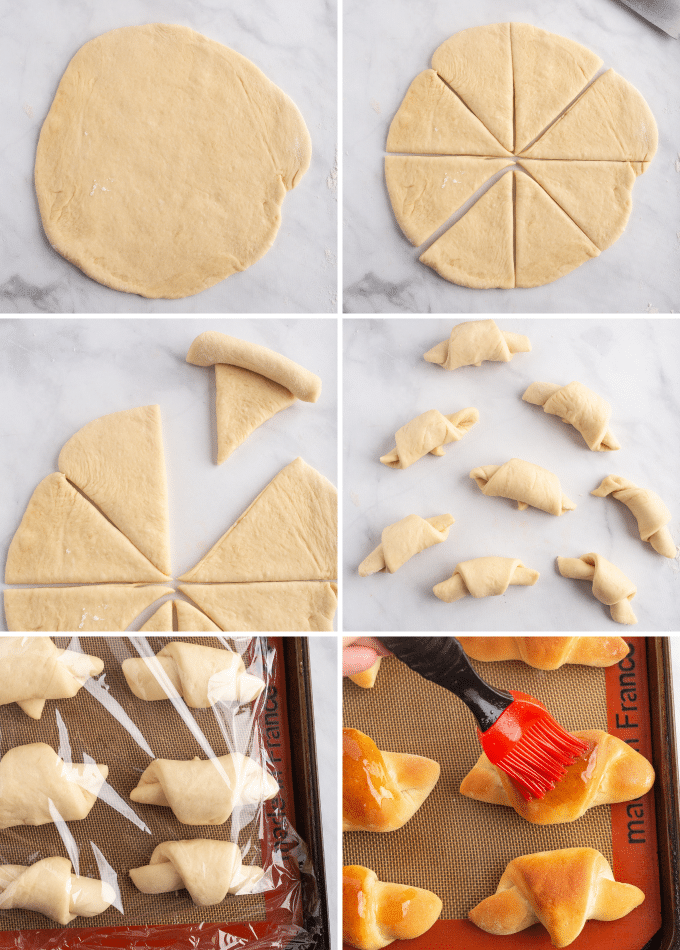
- Roll out portion of dough. Roll out one portion of the dough into an 11″ circle.
- Slice. Cut into 8 equally sized wedges (like a pizza).
- Roll up. Start at the wide end and roll towards the point.
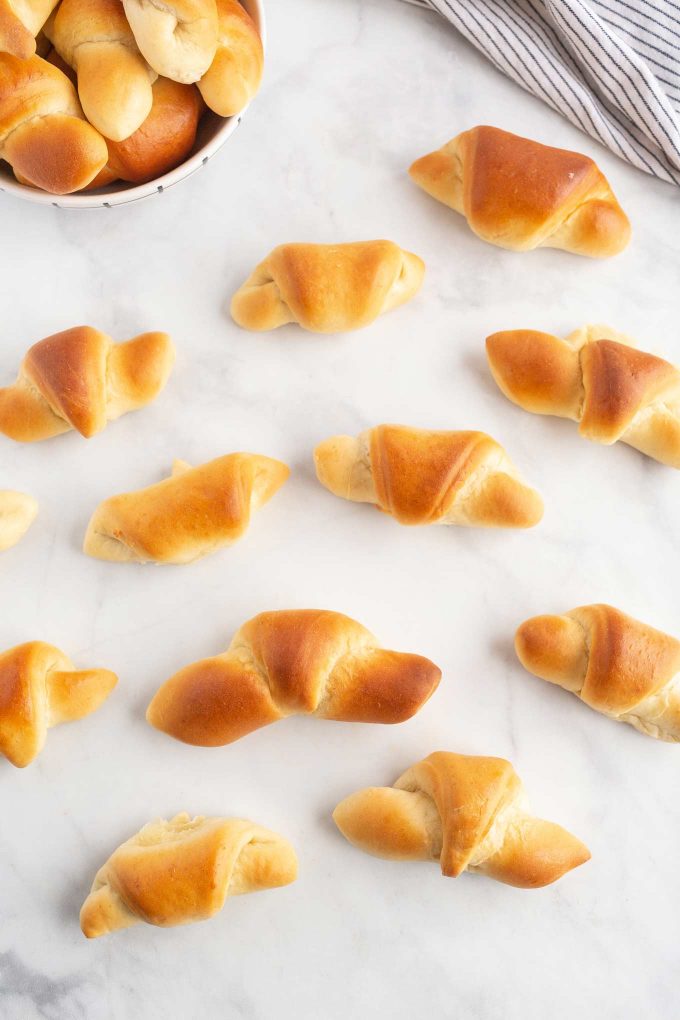
- Add to baking sheet. Add rolls point side down to a baking sheet lined with parchment paper. Repeat with remaining wedges and portions of dough.
- Let rise. Cover baking sheets with plastic wrap and let rise in a warm place about 35-40 minutes, until rolls have puffed up and are roughly doubled in size.
- Bake. Bake at 325°F for about 20 minutes, turning the baking sheets halfway through to ensure even baking.
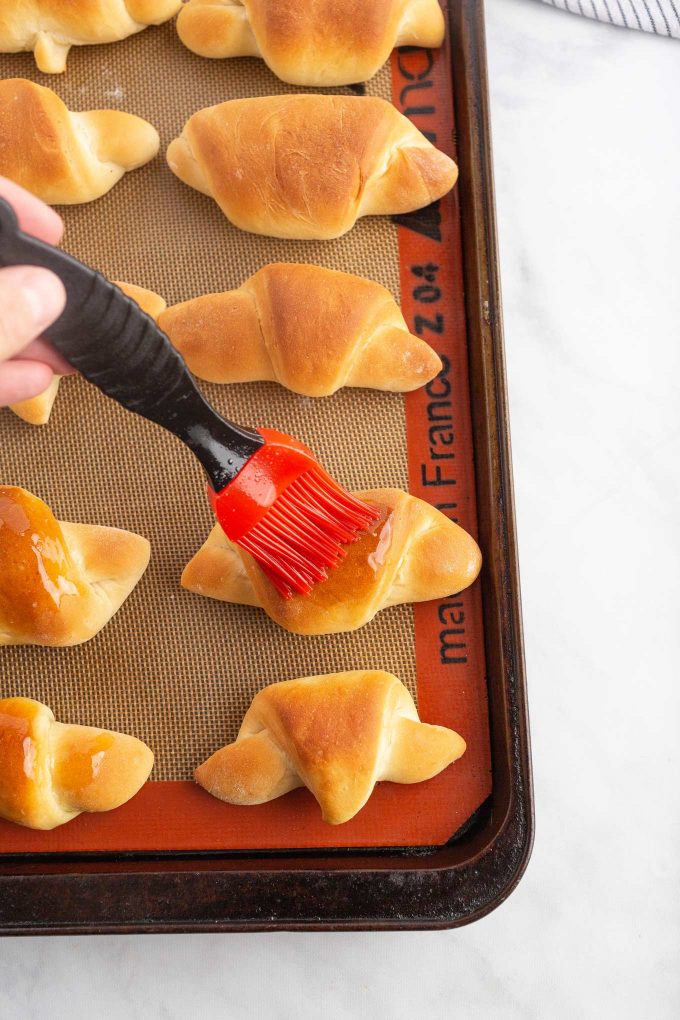
- Brush with butter. Remove rolls from oven and brush with remaining butter.
ADDITIONAL COOKING TIPS
- DON’T PANIC – first things first, take a deep breath. If you’ve never worked with yeast before, you can still make these. Bread-making isn’t as difficult as it’s made out to be… it just takes some time. You have to have a little patience.
- NO STAND MIXER – you don’t have to use one, so don’t discouraged if you don’t own one. You just use a bowl and wooden spoon, but you’ll have to knead by hand until the dough comes together.
- CHECK YOUR YEAST – after sitting with the warm water, the yeast should be frothy and foamy looking. If it doesn’t, then that yeast is likely dead and won’t work for this recipe. Start over with a new batch of yeast.
- MAKE YOUR OWN WARM SPOT FOR THE DOUGH – most people, myself included, don’t know where a naturally warm spot is in their kitchen… or maybe it’s the dead of winter and there’s no warmth anywhere. No worries! Preheat your oven to 200°F and let it preheat for about 3-4 minutes. Then turn your oven OFF, don’t let it get all the way to 200°F. Place the bowl of dough in the oven to rise. Alternately, you can turn on the light in your cold oven and add the bowl of dough to the oven with the door shut.
- NOT PICTURE PERFECT – don’t worry if your crescent rolls aren’t absolutely perfect in shape. Odds are, they won’t be… mine never are anyway! Homemade bread is supposed to be a bit rustic, and once people take a bite, they won’t care what they look like… trust me!
VARIATIONS OF THIS RECIPE
- MAKE AHEAD – like most yeast breads, you can make the dough ahead of time! See the section below titled “making crescent rolls ahead of time” for more detailed information. Super helpful during the holidays!
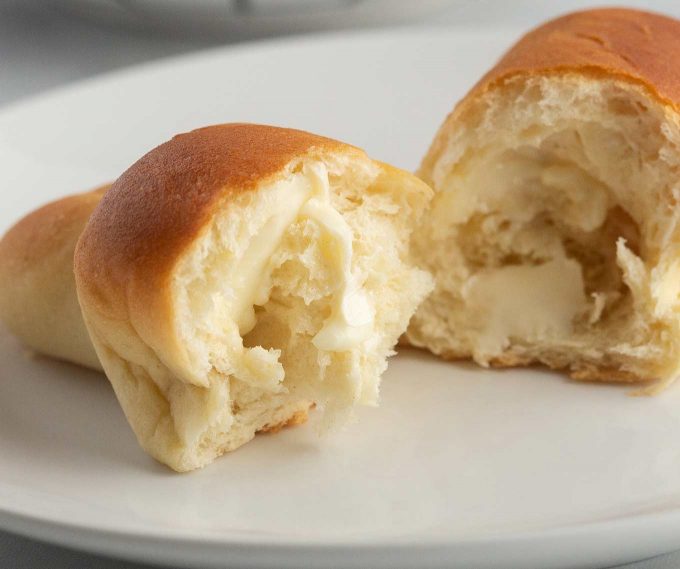
- EXTRA BUTTER LAYER – if you want some extra buttery flavor, try spreading some softened butter in a thin layer over top of the rolled out circle of dough in step #2 of the “divide dough and roll” section of the recipe instructions.
- HONEY – while this is a great base recipe for crescent rolls, you can switch up some of the flavor by swapping out half the sugar with honey.
- HERBS – for a more savory version, try adding 1-2 tsp total of your favorite dried herbs.
- GARLIC – who doesn’t love a great garlic roll? Adding 1 tsp garlic powder to the dough will give it a nice garlic flavor, but you can also add some garlic powder to the melted butter you brush on top of the rolls after they come out of the oven.
MAKING CRESCENT ROLLS AHEAD OF TIME
If you’re making these for a holiday or big family dinner, odds are, you have plenty of other things cooking. So thankfully, these rolls can easily be made ahead of time! In fact, there are two ways the unbaked crescent rolls can be made ahead.
Make-ahead crescent rolls are a great option for those that like to prep ahead, but as a general rule, the longer a yeast dough sits, the stronger the “yeasty” flavor will be.
REFRIGERATOR
Let the dough rise for 2 hours, then cover tightly with plastic wrap and refrigerate for up to 1-2 days.
Remove dough from refrigerator, divide into 4 portions, and continue with step #2 of the “divide dough and roll” section in the recipe instructions.
FREEZER
Complete recipe through step #3 of the “divide dough and roll” section in the recipe instructions. Freeze them on the baking sheet for an hour or two, until hard. Once they’re frozen, transfer them to a freezer-safe container and freeze for up to 2 months.
Thaw overnight in the refrigerator, then remove from the fridge and place on baking sheet as directed in step #3 of the “divide dough and roll” section in the recipe instructions. Continue with recipe, letting them rise a bit longer since they’ll be cold.
LEFTOVER STORAGE
Leftover crescent rolls will keep for a few days at room temperature (in an airtight container). Rolls can also be refrigerated in an airtight container for up to a week.
FREEZING BAKED ROLLS
Baked rolls can be frozen and stored for up to a month or so. To reheat, bake frozen rolls at 325°F for about 10-15 minutes, until warm. For that “just out of the oven” flavor and look, brush them with a little melted butter once they’re warmed up.
SPECIAL EQUIPMENT FOR THIS RECIPE
The following links are affiliate links.
The Chunky Chef, LLC is a participant in the Amazon Services LLC Associates Program, an affiliate advertising program designed to provide a means for sites to earn advertising fees by advertising and linking to amazon.com. For more information regarding this program and what it means for you, please see my Privacy page.
- Stand Mixer – not required, but helps make the kneading quicker and easier.
- Rolling Pin – I love the adjustable rings on this rolling pin – taking all the guesswork out of getting the right thickness.
- Pizza Cutter – using this cutter, it’s super easy to slice the dough into wedges.

BE SURE TO SCROLL DOWN TO CHECK OUT OTHER READERS’ COMMENTS FOR TIPS AND REVIEWS.
AND DON’T FORGET, IF YOU’VE MADE THIS RECIPE, LEAVE A COMMENT AND PLEASE GIVE IT A STAR RATING LETTING ME KNOW HOW YOU ENJOYED IT!
Did you make this? Be sure to leave a review below and tag me @the_chunky_chef on Facebook and Instagram!

Ingredients
- 1 cup whole milk
- 1/2 cup butter divided
- 1/3 cup granulated sugar
- 1 tsp kosher salt
- 4 1/2 tsp instant or active dry yeast (equivalent to 2 standard yeast packets)
- 1/4 cup warm water (just warm to the touch)
- 2 large eggs
- 4 1/2 cups all purpose flour (with a possible 1/2 cup extra)
- additional melted butter for after baking
Instructions
WARM MILK
- Add milk to a small saucepan and heat over MED heat until milk forms a skin on top and reaches a temperature of 170 F degrees. Remove from heat and set aside.
- Combine 1/3 cup butter, sugar and salt in a mixing bowl. Add scalded milk and let sit until mixture reaches about 110 F degrees. Stir occasionally as it cools.
COMBINE YEAST AND WATER
- While milk is cooling, combine warm water and yeast in a small bowl and set aside for about 5 minutes. Yeast should get frothy after this time.
ADD EGGS
- When milk mixture reaches about 110 F degrees, add eggs to mixing bowl with milk mixture and whisk to combine.
COMBINE ALL INGREDIENTS/MIX
- To the bowl of a stand mixer fitted with the dough hook attachment, add 4 1/2 cups flour and yeast mixture. Turn the mixer on low and while it’s running, slowly pour in the milk mixture.
KNEAD DOUGH
- Once combined, increase mixer speed to medium and knead until smooth and elastic/shiny. This should take between 6 and 12 minutes.
- About halfway through, if dough is still really sticky, add additional flour, a tablespoon or two at a time, until dough is tacky but not sticky.
- While mixer is kneading the dough, melt the remaining butter and set aside.
ADD DOUGH TO BOWL AND RISE
- Flour your work surface and turn out dough. Shape into a ball and transfer to a greased bowl.
- Brush with a little bit of the melted butter. Cover with plastic wrap and let rise for 2 hours in a warm place, or until doubled in size.
DIVIDE DOUGH AND ROLL
- After dough has risen, line a couple baking sheets with parchment paper or grease with cooking spray. Lightly flour your work surface and turn out dough. Divide into 4 equally sized portions.
- Roll one portion of dough out into a 10-11” circle. Use a pizza cutter (or knife) and slice the circle into 8 wedges (like a pizza).
- Start at the wide edge and roll towards the point. Transfer rolls (point side down) to prepared baking sheets, keeping 1-2” distance between the rolls. Repeat with remaining portions of dough.
LET ROLLS RISE AGAIN
- Cover baking sheets with plastic wrap and let rise in a warm place until rolls have doubled in size, about 35-40 minutes.
BAKE
- While rolls are rising, preheat oven to 325 F degrees. Bake rolls 20 minutes, rotating baking sheets halfway through, until lightly golden brown.
- Brush with melted butter after removing from oven.
Want to save this recipe for later? Click the heart in the bottom right corner to save to your own recipe box!
Nutrition Disclaimer
The Chunky Chef is not a dietician or nutritionist, and any nutritional information shared is an estimate. If calorie count and other nutritional values are important to you, we recommend running the ingredients through whichever online nutritional calculator you prefer. Calories can vary quite a bit depending on which brands were used.


Janet S. says
Doesn’t the plastic wrap stick to the crescent dough while they’re rising?
The Chunky Chef says
I don’t find that it sticks, but if you’re worried, you could spray the plastic wrap with a little nonstick spray, then add it sprayed side down 🙂
Maria P Morales says
I came across your website and it looks very interesting and I like what I have seen so far I will try some of your recipes thank you
Kathy says
These look wonderful! Yummm! 🙂
Sandra McCollum says
This is really perfect!! My kids loved it!
Suzy says
Although these take a little more time than canned biscuits, I will say they are way better! So worth it!
Cathy says
They turned out so light & fluffy!
Catalina says
Sounds so easy with your step by step recipe! They are on my next to make list!
Erin | Dinners,Dishes and Dessert says
This Rosemary Focaccia Recipe is looks absolutely delicious! Yummy!
Sara Welch says
Always prefer handmade recipes over store bought, and this is no exception! Such a great side dish with dinner!
Beth says
These look so delicious and yummy! I can’t wait to make these! My family is going to love them!